


C. Using NetBuild
NetBuild is a feature of Digital Mars C++ that lets you distribute the task of building a project across the network. Using NetBuild, you can employ any idle PCs on the network to compile your files.Before you can use NetBuild you must install the NetBuild Administrator software on your network server and the NetBuild Server software on any PCs that will participate in the distributed build. For information on how to install the NetBuild feature of Digital Mars C++, see the Getting Started Guide.
The following sections detail how to use the Digital Mars C++ NetBuild feature.
Using the Build Client
Your PC (the one controlling the build) is called the build client. Functioning as a client, it must request a server to perform a task. The PCs that compile your project are called build servers.Configuring the build client
The options for controlling the NetBuild on the build client are located in the Project Settings dialog box. To access these options, select Settings from the IDDE's Project menu, then click on the Build tab to bring up the Build page of the Project Options dialog box. In the list of subpages on the left, choose Make.The Make subpage is shown in Figure C-1.
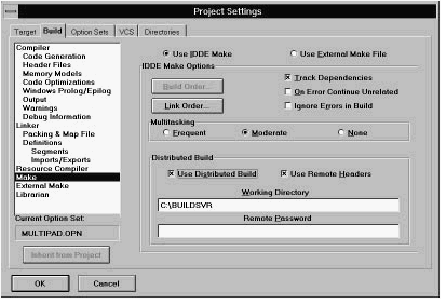
[Figure C-1 The Make subpage
To turn on the NetBuild feature, make sure that the Use NetBuild check box has a check mark.
If you enable the Use Remote Headers option, the client PC instructs the build servers to use the header files on their local drives (as opposed to getting the header files from the build client). This option can be overridden on the build server side by disabling the Use Local Headers option in the Build Server Configuration window. See "Configuring a build server," later in this chapter.
When you enable the Use NetBuild option, you must specify the pathname of the build server control directory in the Working Directory textbox. This is the directory in which the NetBuild Administrator is installed on the network server. You specify this pathname in the Working Directory textbox. All the PCs participating in the distributed build must have access to this directory.
If your network administrator has set up a network password, you must enter it in the Remote Password textbox. If sources are shared through Microsoft Network on a local hard disk, and a sharing password is used for access protection, it must be specified in the Remote Password textbox.
Starting a distributed build
Once you have configured the build client, every time you rebuild or update your project, the NetBuild system identifies the build server( s) that can participate in the distributed build. If there is at least one build server available, the distributed build can occur; otherwise the build client builds the project locally. For information on starting and configuring build servers, see the following section.When the distributed build process begins, the Build Client window opens on the client PC's screen (see Figure C-2). This window allows you to monitor the progress of the distributed build.
When the build is done, a message specifying successful completion or an error condition is displayed in the output window on the build client.
Monitoring a distributed build
You can monitor a distributed build from the build client PC by viewing the messages displayed in the Build Client window.

[Figure C-2 The Build Client window This window displays an icon each for the build client and each of the build servers participating in the distributed build. Each icon shows a list of the programs and header files being handled by that particular PC. The name of the build server is shown at the top of its icon.
Stopping a distributed build
You can cancel a build from the build client PC by:- Choosing the Stop! command in the output window
- Choosing Stop Build from the Project menu
- From the client PC, clicking the Cancel button in the build client window
Using a Build Server
A build server is a PC that is helping the build client PC compile a project. A build server normally is idle until a client requests it to perform a task. There must be at least one build server in the distributed build environment.Starting a build server
You start the NetBuild Server application by double-clicking on its icon, or as you start any other Windows program. Once started, the server application is minimized into an icon. It then runs in the background, waiting to receive a task from a build client.Configuring a build server
When the build server compiles files, the build server application name changes to the name of the file it is compiling.Double-click on the NetBuild Server application icon to display a Build Server Configuration window (see Figure C-3).

[Figure C-3 The Build Server Configuration window
This window displays the build server name, the pathname of the working directory, and the pathname of the directory containing the header files used in the compilation. (If the pathname of the working directory is changed, then the pathname must be identical in the client working directory.) This window also contains a message area; this is where messages, such as the name of the file being compiled, the file being read, and error messages, are displayed.
If Use Local Header Files option is enabled, the build server looks for the header files in the "Directory for Header Files" specified in the build server window. If the Use Local Header Files option is not enabled, the build server gets the header files from the build client PC. This option is enabled if the Use Remote Headers option is enabled on the client PC; however, you can still force the build client to retrieve the headers from the build client by disabling the Use Local Header Files option in the Build Server Configuration window.
Note: If Use Local Header Files is selected and the build server needs a header file and cannot find it, the build server sends the job back to the build client for processing.
If the Status Bar option is selected, the status bar is displayed at the bottom of the Build Server Configuration window.
Stopping a build server
You can close the NetBuild Server application by:- Pressing Alt+F4
- Double-clicking on the system menu button
- Choosing Close on the system menu
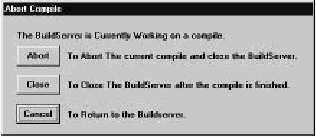
[Figure C-4 Abort Compile dialog box
If you click on Cancel in the dialog box, the build server resumes processing. If you click on Close, the build server finishes processing any files that are in the queue (that is, files currently being compiled and files already read), then stops. If you click on Abort, the build server halts the current compilation and returns the uncompleted job to the build client. If you selected Close or Abort, the NetBuild Server application closes and you must restart it if you want the PC to be able to participate in a distributed build again. (See "Starting a build server," earlier in this chapter.)
Troubleshooting
If the build client or build server seems to hang (because no messages are being displayed), wait for a few minutes. NetBuild tries to establish a connection several times before giving up.If both the build client and build server start, but the build server does not compile your program, then:
- Make sure you selected the NetBuild option on the Make Subpage.
- Make sure the NetBuild Working Directory has the correct pathname for the build server control directory.
- Make sure the build client and build server have the same drive mapping.
- Make sure the build servers have access tot he include directories. The include files can be installed on the build server, or in a fully-sharable directory on the build client.
- Make sure the network is not down.
- Make sure the build server is still running. If the build server is still displaying messages, the network connection may be broken. If not, Windows may be hung. If the build server is in iconized form, it may have finished the compile, but was not able to communicate with the build client.
- Make sure all relevant files have been moved to the network drive.
- Make sure the environment variables that indicate where to find the header files are set properly.
NetBuild Messages
This section describes the NetBuild error and information messages.Build client messages
- Build being done on build_server
- This informational message is repeated for each command line. build_server is the name of the build server compiling the module.
- Compile has been aborted, Rescheduling to another server
- The build server was shut down abruptly. The job has been sent to another server to be compiled. This message is displayed when someone cancels the build and selects the abort option.
- NetBuild has lost contact with build_server
- The netbuild has lost contact with the specified server. The build server PC is hung, the network is down, or the netbios protocol is not set correctly.
- There is not enough memory to do distributed builds
- The system does not have enough memory to run.
- Unable to access build_server. client_server will compile this build locally
- The build server was not able to access the specified file. The more likely problems are that the drive on the client side is not shared or the file is not in the shared directory.
- Unable to Load network connection Dlls (WNET32, WNET16)
- The system was not able to load the following DLLs: wnet32.dll, wnet16.dll. They may be missing or corrupted.
- Unable to Load network share Dlls (WSHR32, WSHR16)
- The system was not able to load the following DLLs: wshr32.dll, wshr16.dll. They may be missing or corrupted.
Build server messages
- Another Station has the control file locked
- The control file has been locked by another station. It is probable that station is also hung.
- Error checking for Control file, Error xx
- An unexpected error has occurred. Record the error number (xx) and contact technical support, providing as much information as possible.
- Error checking for Control Path Error xx
- An unexpected error has occurred. Record the number (xx) and contact technical support, providing as much information as possible.
- Error in packet
- The build server and build client software are not the same version.
- Problems reading ini file.
- There is a problem reading the .ini file. This message should not occur if the .ini file is missing.
- Problem with initializing build server name
- There is a problem reading the .ini file. This message should not occur if the .ini file is missing.
- Problem with initializing control file
- There is a problem reading the .ini file. This message should not occur if the .ini file is missing.
- Problem with initializing header path
- There is a problem reading the .ini file. This message should not occur if the .ini file is missing.
- The control file path is invalid
- The specified build server control file pathname specified in the NetBuild Working Directory dialog box is not valid.
Network errors
- Network Dlls Failed to initialize Correctly, Cannot initialize
- Netbios on lana xx Unable to initialize netbios. It may not be installed correctly. The lana xx refers to the netbios protocol that has failed (there can be several on a machine).
- Network Dlls Failed to initialize Correctly, Listens Failed To Establish
- System was able to initialize netbios but unable to set up communication.
- Network Dlls Failed to initialize Correctly, Netbios command xx error code yy lana zz
- A call to netbios has failed. This message lists the command, the error code, and the lana number (all in hexadecimal).
- Network Dlls Failed to initialize Correctly, Netbios is not installed.
- This message refers to the netbios name table. The system probably has crashed. The best solution is to restart your computer.
- Network Dlls Failed to initialize Correctly, Netbios name already exists.
- This message refers to the netbios name table. The system probably has crashed. The best solution is to restart your computer.
- Network Dlls Failed to initialize Correctly, Netbios name table full.
- This message refers to the netbios name table. The system probably has crashed. The best solution is to restart your computer.
- Network Dlls Failed to initialize Correctly, No Error
- Information Available Unknown error. No error information is available. This is a catch-all error that the system uses.
- Network Dlls Failed to initialize Correctly, Out Of Memory
- System is low on memory.
- Network Dlls Failed to initialize Correctly, Reset Timed out on lana xx
- Unable to reset the netbios settings. It probably is not installed correctly. The lana xx refers to the netbios protocol that has failed. (There can be several on a machine.)
- Network Dlls Failed to initialize Correctly, Unable To Get Network Address
- Unable to get the address of the network card. The card or netbios probably is not installed correctly.
- Network Dlls Failed to initialize Correctly, Unknown Error
- Unknown error. No error information is available. This is a catch-all error that the system uses.
- Unable to Load network Dll because could not find entry point in network DLL
- The DLL, which was able to load, is not a valid DLL.
- Unable to Load network Dll because could not load NB32.DLL
- The system could not load the nb32.dll file. This is a Windows NT or Windows 95 message.
- Unable to Load network Dll because could not load NBND.DLL
- The system could not load the nbnd.dll or nbd.dll files. This is a Windows NT or Windows 95 message.