


28. Bitmap, Cursor, Icon, and Font Editors
This ResourceStudio reference chapter contains details about the commands and options found in the Bitmap editor, the Cursor editor, the Icon editor, and the Font editor. For an introduction to ResourceStudio, see Chapter 7, "Adding Look and Feel with Resources."This chapter shows the editors running in standalone windows. If you edit a binary resource directly (that is, if you open or create it by choosing Open from the Shell window's File menu), the File menu you will see will not match those shown below, and the ID and File fields in the Property sheet will be disabled.
Bitmap Editor
The Bitmap editor (see Figure 28-1) is used to edit bitmaps.
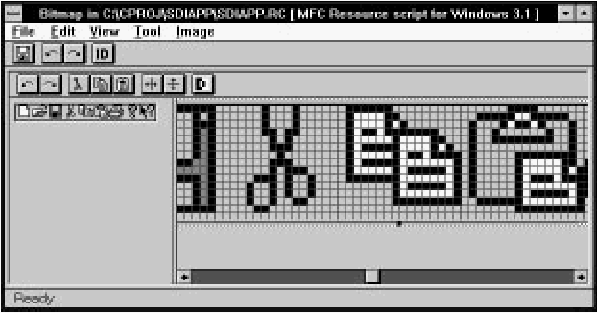
[Figure 28-1 The Bitmap editor
The Bitmap editor displays two views of the bitmap. Each view can be independently zoomed; you may wish to keep one view at normal size for reference, and one at a higher magnification for easier drawing. You can draw in either view, though.
Drawing tools are selected by choosing commands in the Tool menu, or by clicking on the tool in the toolbox. Colors are selected in the palette section of the toolbox. The View menu is used to zoom the views and to turn on the grid. Simple image manipulation functions are available in the Image menu.
For more information about using the Bitmap editor, see Chapter 7, "Adding Look and Feel with Resources."
BitmapExpress
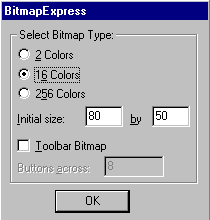
As a new bitmap is created, the BitmapExpress dialog box opens (see Figure 28-2). This dialog box is used to set initial bitmap properties.
[Figure 28-2 BitmapExpress
Select bitmap type
Specifies the number of colors in the bitmap (2, 16, or 256).Initial size
Specifies the bitmap width and height.Toolbar bitmap
Select this option if the bitmap will be used as the toolbar in an MFC application. If this option is selected, the number of colors is set to 16 and the initial size is determined by the value of the Buttons across option.Buttons across
Specifies the number of buttons for toolbar bitmaps. The bitmap's initial size is changed to accommodate the number of buttons you request. Each button is 15 pixels high and 16 pixels across.File menu commands
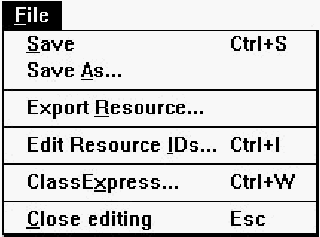
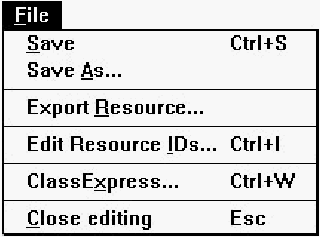
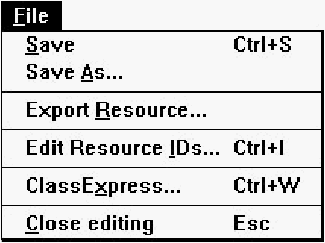
The File menu (see Figure 28-3) contains commands to save the resource file, to edit resource IDs, and to perform other miscellaneous functions.
[Figure 28-3 Bitmap editor File menu
- Save
- Saves the resource file. If the file is unnamed, this command executes Save As.
- Save As
- Opens a Windows File Save As dialog box, which can be used to save the resource file under a new name.
- Export Resource
- Opens a dialog box which can be used to save the bitmap in a separate file.
- Edit Resource IDs
- Opens the Resource ID Browser dialog box, used to browse and modify resource IDs. For more information about managing resource IDs and using the Resource ID Browser dialog box, see "Managing Resource IDs," in Chapter 7, "Adding Look and Feel with Resources."
- ClassExpress
- Runs ClassExpress, passing the filename of the resource file as the project that ClassExpress should open. This command is only enabled if the Bitmap editor is running in the right pane of the Browser window.
- Class Editing
- Closes the Bitmap editor.
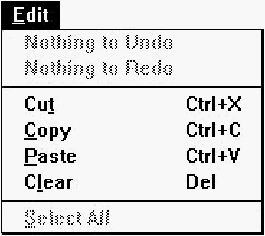
Edit menu commands
The Edit menu (see Figure 28-4) contains standard editing commands. You can undo operations, and can cut, copy, paste, and clear rectangular regions of the bitmap. To select a region to cut, copy, or clear, select the Selection tool from the toolbox or from the Tool menu, then drag a box around the region.

[Figure 28-4 Bitmap editor Edit menu
- Undo
- Undoes the last Bitmap editor operation.
- Redo
- Redoes the last undone Bitmap editor operation.
- Cut
- Copies the selected region to the Clipboard, then clears the region in the bitmap, filling it with the current background color.
- Copy
- Copies the selected region to the Clipboard.
- Paste
- Copies the region in the Clipboard to the bitmap. The new region is initially placed in the upper left corner of the bitmap, but may be dragged to a new location.
- Clear
- Clears the selected region, filling it with the current background color. If no region is selected, the entire bitmap is cleared.
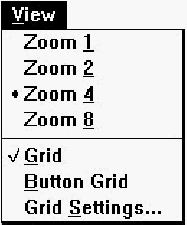
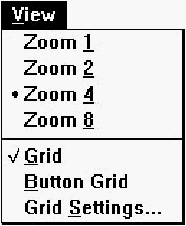
View menu commands
The View menu (see Figure 28-5) contains commands to set view magnification and to set grid options.

[Figure 28-5 Bitmap editor View menu
- Zoom 1
- Sets the current view's zoom factor to 1 (normal size).
- Zoom 2
- Sets the current view's zoom factor to 2 (twice normal size).
- Zoom 4
- Sets the current view's zoom factor to 4 (four times normal size).
- Zoom 8
- Sets the current view's zoom factor to 8 (eight times normal size).
- Grid
- Turns on the grid. The grid is only visible in views where the zoom factor is 4 or 8.
- Button Grid
- Turns on the button grid. The button grid is used to identify the boundaries of toolbar buttons when you are creating a toolbar bitmap.
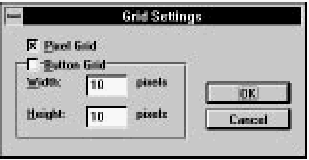
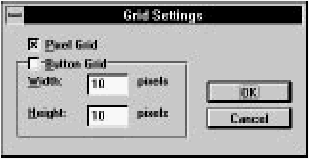
- Grid Settings
- Opens the Grid Settings dialog box (see Figure 28-6), used to set
grid options.
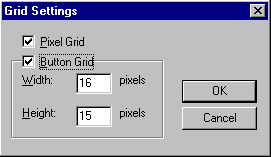
[Figure 28-6 Grid Settings dialog box
Pixel grid
Turns on display of the pixel grid.Button grid
Turns on display of the button grid. The spacing of points on the button grid can be specified in the Width and Height fields; defaults for an MFC application toolbar are 16 pixels wide by 15 pixels high.
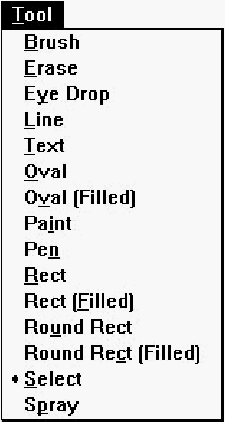
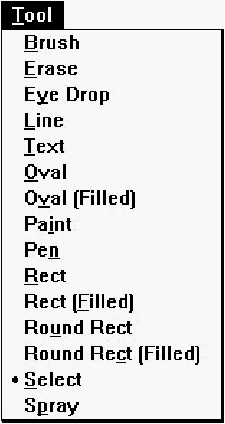
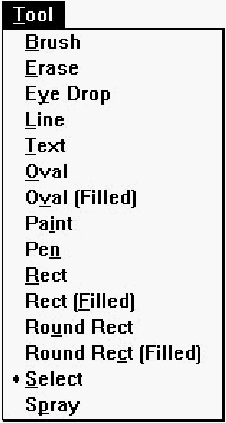
Tool menu commands
The Tool menu (see Figure 28-7) lets you select drawing tools. While over the drawing area, the cursor changes shape to indicate the currently selected tool. To draw, click or click and drag (as appropriate) in the drawing area. Using the right button rather than the left reverses the roles of foreground and background colors. Drawing tools can also be selected in the toolbox. For more information about drawing operations in the Bitmap editor, see Chapter 7, "Adding Look and Feel with Resources."

[Figure 28-7 Bitmap editor Tool menu
- Brush
- Selects the brush tool.
- Erase
- Selects the eraser tool.
- Eye Drop
- Selects the eye-dropper tool. Use this tool to select foreground and background colors directly from the image.
- Line
- Selects the straight line tool.
- Text
- Selects the text tool.
- Oval
- Selects the hollow oval tool.
- Oval (Filled)
- Selects the solid oval tool.
- Paint
- Selects the paint can (flood fill) tool.
- Pen
- Selects the pen (pencil) tool.
- Rect
- Selects the hollow rectangle tool.
- Rect (Filled)
- Selects the solid rectangle tool.
- Round Rect
- Selects the hollow rounded rectangle tool.
- Round Rect (Filled)
- Selects the solid rounded rectangle tool.
- Select
- Selects the Selection tool. Use this tool to select rectangular regions for cut, copy, clear, drag, flip, and invert operations.
- Spray
- Selects the spray brush (airbrush) tool.
Image menu commands
Commands in the Image menu (see Figure 28-8) perform simple image manipulation functions. To select a region to flip or invert, select the Selection tool from the toolbox or from the Tool menu, then drag a box around the region. If no region is selected, these commands operate on the entire bitmap.

[Figure 28-8 Bitmap editor Image menu
- Flip Vertically
- Flips the selected region vertically.
- Flip Horizontally
- Flips the selected region horizontally.
- Invert Colors
- Inverts the colors in the selected region (for example, in a 16 color bitmap, color 0 is replaced with color 15, color 1 is replaced with color 14, and so on).
Toolbar commands
The Bitmap editor toolbar (see Figure 28-9) provides quick access to frequently used menu commands.

[Figure 28-9 Bitmap editor toolbar
- Undo:
- Same as choosing Undo from the Edit menu. Right-click on this button to undo multiple operations at once.
- Redo:
- Same as choosing Redo from the Edit menu. Right-click on this button to redo multiple operations at once.
- Cut:
- Same as choosing Cut from the Edit menu.
- Copy:
- Same as choosing Copy from the Edit menu.
- Paste:
- Same as choosing Paste from the Edit menu.
- Flip horizontally:
- Same as choosing Flip Horizontally from the Image menu.
- Flip vertically:
- Same as choosing Flip Vertically from the Image menu.
- Invert colors:
- Same as choosing Invert Colors from the Image menu.
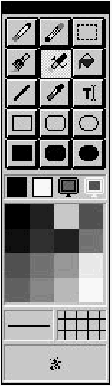
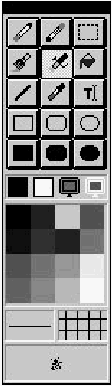
Toolbox
The Bitmap editor toolbox (see Figure 28-10) provides quick access to the tools available in the Tool menu. The toolbox also lets you select foreground and background colors, brush types, background pattern, and line type.For more information on the Bitmap editor toolbox, see Chapter 7, "Adding Look and Feel with Resources."
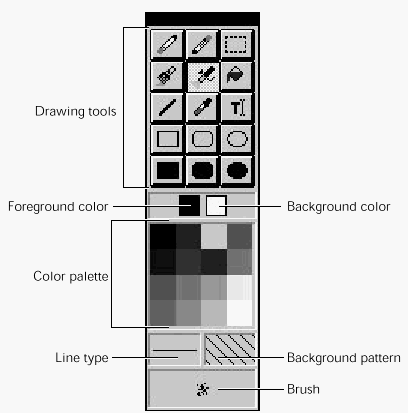
[Figure 28-10 Bitmap editor toolbox
Bitmap properties
Bitmaps have two pages of properties. The General properties are shown in Figure 28-11.
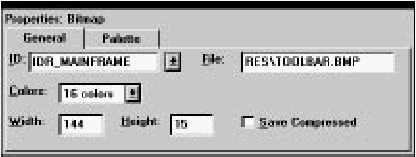
[Figure 28-11 Bitmap General properties
Specify a filename for the bitmap in the File textbox. The Width and Height of the bitmap can be changed here, or the bitmap can be resized in the main display by dragging one of the handles along the bitmap edge.
Palette properties of a bitmap are shown in Figure 28-12.
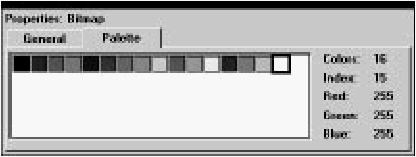
[Figure 28-12 Bitmap Palette properties
Foreground and background drawing colors can be set by respectively clicking and right-clicking colors in this display. Double-clicking a color opens the Custom Color dialog box, which can be used to change the color's red, green, and blue components.
Cursor Editor
The Cursor editor (see Figure 28-13) is used to edit cursors.
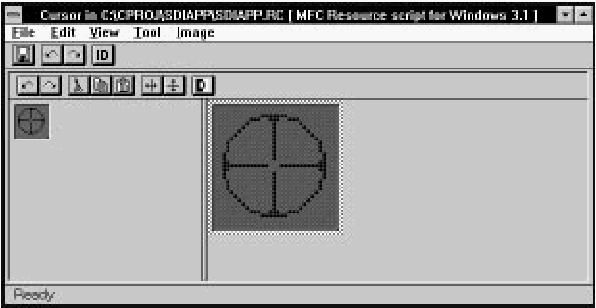
[Figure 28-13 The Cursor editor
Since cursors are much like bitmaps, the Cursor editor behaves much like the Bitmap editor (see "Bitmap Editor," earlier in this chapter). The distinguishing characteristics of cursors are as follows:
- A cursor resource may contain more than one cursor. ResourceStudio lets you create up to four different cursors in a cursor resource. The four possible cursor types have predefined sizes and color depths.
- In addition to normal colors, cursors can have areas which are tagged "Transparent" and "Inverted." In Transparent areas, the background screen color shows through the cursor. In Inverted areas, the background screen color is bitwise-complemented.
- Cursors have a "hotspot," a particular pixel which is used by Windows to map the cursor to a screen location.
Drawing tools are selected by choosing commands in the Tool menu, or by clicking on the tool in the toolbox. Colors are selected in the palette section of the toolbox. The View menu is used to zoom the views and to turn on the grid. Simple image manipulation functions are available in the Image menu. The cursor hotspot is set by choosing Set Hotspot from the Image menu.
File menu commands
The File menu (see Figure 28-14) contains commands to save the resource file, to edit resource IDs, and to perform other miscellaneous functions.
[Figure 28-14 Cursor editor File menu
- Save
- Saves the resource file. If the file is unnamed, this command executes Save As.
- Save As
- Opens a Windows File Save As dialog box, which can be used to save the resource file under a new name.
- Export Resource
- Opens a dialog box which can be used to save the cursor resource in a separate file.
- Export Resource IDs
- Opens the Resource ID Browser dialog box, used to browse and modify resource IDs. For more information about managing resource IDs and using the Resource ID Browser dialog box, see "Managing Resource IDs," in Chapter 7, "Adding Look and Feel with Resources."
- ClassExpress
- Runs ClassExpress, passing the filename of the resource file as the project that ClassExpress should open. This command is only enabled if the Cursor editor is running in the right pane of the Browser window.
- Close Editing
- Closes the Cursor editor.
Edit menu commands
The Edit menu (see Figure 28-15) contains standard editing commands. You can undo operations, and can cut, copy, paste, and clear rectangular regions of the cursor. To select a region to cut, copy, or clear, select the Selection tool from the toolbox or from the Tool menu, then drag a box around the region.

[Figure 28-15 Cursor editor Edit menu
- Undo
- Undoes the last Cursor editor operation.
- Redo
- Redoes the last undone Cursor editor operation.
- Cut
- Copies the selected region to the Clipboard, then clears the region in the cursor, filling it with the current background color.
- Copy
- Copies the selected region to the Clipboard.
- Paste
- Copies the region in the Clipboard to the cursor. The new region is initially placed in the upper-left corner of the cursor, but may be dragged to a new location.
- Clear
- Clears the selected region, filling it with the current background color. If no region is selected, the entire cursor is cleared.
- Select All
- Select all cursor regions.
View menu commands
The View menu (see Figure 28-16) contains commands to set view magnification and to set grid options.
[Figure 28-16 Cursor editor View menu
- Zoom 1
- Sets the current view's zoom factor to 1 (normal size).
- Zoom 2
- Sets the current view's zoom factor to 2 (twice normal size).
- Zoom 4
- Sets the current view's zoom factor to 4 (four times normal size).
- Zoom 8
- Sets the current view's zoom factor to 8 (eight times normal size).
- Grid
- Turns on the grid. The grid is only visible in views where the zoom factor is 4 or 8.
- Button Grid
- Turns on the button grid.
- Grid Settings
- Opens the Grid Settings dialog box (see Figure 28-17), used to set
grid options.
[Figure 28-17 Grid Settings dialog box
Pixel grid
Turns on display of the pixel grid.Button grid
Turns on display of the button grid. The spacing of points on the button grid can be specified in the Width and Height fields.
Tool menu commands
The Tool menu (see Figure 28-18) lets you select drawing tools. While over the drawing area, the cursor changes shape to indicate the currently selected tool. To draw, click or click and drag (as appropriate) in the drawing area. Using the right button rather than the left reverses the roles of foreground and background colors. Drawing tools can also be selected in the toolbox. Drawing operations are identical to those in the Bitmap editor.For more information, see Chapter 7, "Adding Look and Feel with Resources."
[Figure 28-18 Cursor editor Tool menu
- Brush
- Selects the brush tool.
- Erase
- Selects the eraser tool.
- Eye Drop
- Selects the eye-dropper tool. Use this tool to select foreground and background colors directly from the image.
- Line
- Selects the straight line tool.
- Text
- Selects the text tool.
- Oval
- Selects the hollow oval tool.
- Oval (Filled)
- Selects the solid oval tool.
- Paint
- Selects the paint can (flood fill) tool.
- Pen
- Selects the pen (pencil) tool.
- Rect
- Selects the hollow rectangle tool.
- Rect (Filled)
- Selects the solid rectangle tool.
- Round Rect
- Selects the hollow rounded rectangle tool.
- Round Rect (Filled)
- Selects the solid rounded rectangle tool.
- Select
- Selects the Selection tool. Use this tool to select rectangular regions for cut, copy, clear, drag, flip, and invert operations.
- Spray
- Selects the spray brush (airbrush) tool.
Image menu commands
Commands in the Image menu (see Figure 28-19) perform simple image manipulation functions. To select a region to flip or invert, select the Selection tool from the toolbox or from the Tool menu, then drag a box around the region. If no region is selected, these commands operate on the entire cursor. This menu also contains a command to set the cursor hotspot.

[Figure 28-19 Cursor editor Image menu
- Flip Vertically
- Flips the selected region vertically.
- Flip Horizontally
- Flips the selected region horizontally.
- Invert Colors
- Inverts the colors in the selected region (for example, in a 16 color cursor, color 0 is replaced with color 15, color 1 is replaced with color 14, and so on).
- Set Hotspot
- Sets the cursor hotspot. You are prompted to click on the image at the location of the hotspot.
Toolbar commands
The Cursor editor toolbar (see Figure 28-20) provides quick access to frequently used menu commands.

[Figure 28-20 Cursor editor toolbar
- Undo:
- Same as choosing Undo from the Edit menu. Right-click on this button to undo multiple operations at once.
- Redo:
- Same as choosing Redo from the Edit menu. Right-click on this button to redo multiple operations at once.
- Cut:
- Same as choosing Cut from the Edit menu.
- Copy:
- Same as choosing Copy from the Edit menu.
- Paste:
- Same as choosing Paste from the Edit menu.
- Flip horizontally:
- Same as choosing Flip Horizontally from the Image menu.
- Flip vertically:
- Same as choosing Flip Vertically from the Image menu.
- Invert colors:
- Same as choosing Invert Colors from the Image menu.
Toolbox
The Cursor editor toolbox (see Figure 28-21) provides quick access to the tools available in the Tool menu. The toolbox also lets you select foreground and background colors, brush types, background pattern, and line type.
[Figure 28-21 Cursor editor toolbox
The toolbox is slightly different from the toolbox used in the Bitmap editor. In addition to the usual color palette, two extra colors are available: Transparent and Inverted. Transparent is used to draw areas in the cursor where the background screen color shows through. Inverted is used to draw areas in the cursor where the background screen color is bitwise-complemented.
Other than these two additions, the Cursor editor toolbox is identical to the Bitmap editor toolbox. For more information on the Bitmap editor toolbox, see Chapter 7, "Adding Look and Feel with Resources."
Cursor properties
Cursor properties are shown in Figure 28-22.

[Figure 28-22 Cursor properties
Specify a filename for the cursor resource in the File textbox. The cursor hotspot coordinates are displayed below the File textbox. The Image field specifies which of the cursors in the cursor resource is currently displayed. Click on New to create a new cursor in the current resource, or click on Delete to delete the current cursor from the resource. Note that you cannot delete the last cursor from the resource.
Icon Editor
The Icon editor (see Figure 28-23) is used to edit icons.
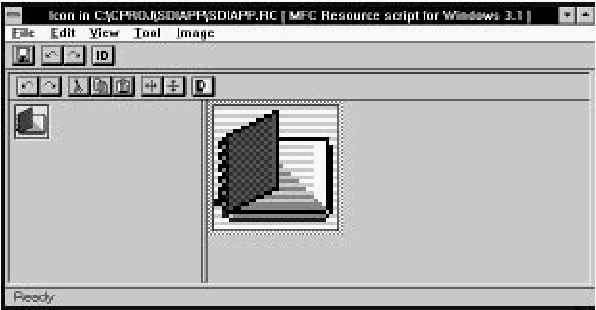
[Figure 28-23 The Icon editor
Since icons are much like bitmaps, the Icon editor behaves much like the Bitmap editor (see "Bitmap Editor," earlier in this chapter). The distinguishing characteristics of icons are as follows:
- An icon resource may contain more than one icon. ResourceStudio lets you create up to twelve different icons in an icon resource. You can create 32 by 16, 32 by 32, 16 by 16, and 64 by 64 pixel icons in 2, 8, 16, and 256 colors.
- In addition to normal colors, icons can have areas which are tagged "Transparent" and "Inverted." In Transparent areas, the background screen color shows through the icon. In Inverted areas, the background screen color is bitwise-complemented.
Drawing tools are selected by choosing commands in the Tool menu, or by clicking on the tool in the toolbox. Colors are selected in the palette section of the toolbox. The View menu is used to zoom the views and to turn on the grid. Simple image manipulation functions are available in the Image menu.
File menu commands
The File menu (see Figure 28-24) contains commands to save the resource file, to edit resource IDs, and to perform other miscellaneous functions.
[Figure 28-24 Icon editor File menu
- Save
- Saves the resource file. If the file is unnamed, this command executes Save As.
- Save As
- Opens a Windows File Save As dialog box, which can be used to save the resource file under a new name.
- Export Resource
- Opens a dialog box which can be used to save the icon resource in a separate file.
- Edit Resource IDs
- Opens the Resource ID Browser dialog box, used to browse and modify resource IDs. For more information about managing resource IDs and using the Resource ID Browser dialog box, see "Managing Resource IDs," in Chapter 7, "Adding Look and Feel with Resources."
- ClassExpress
- Runs ClassExpress, passing the filename of the resource file as the project that ClassExpress should open. This command is only enabled if the Icon editor is running in the right pane of the Browser window.
- Close Editing
- Closes the Icon editor.
Edit menu commands
The Edit menu (see Figure 28-25) contains standard editing commands. You can undo operations, and can cut, copy, paste, and clear rectangular regions of the icon. To select a region to cut, copy, or clear, select the Selection tool from the toolbox or from the Tool menu, then drag a box around the region.

[Figure 28-25 Icon editor Edit menu
- Undo
- Undoes the last Icon editor operation.
- Redo
- Redoes the last undone Icon editor operation.
- Cut
- Copies the selected region to the Clipboard, then clears the region in the icon, filling it with the current background color.
- Copy
- Copies the selected region to the Clipboard.
- Paste
- Copies the region in the Clipboard to the icon. The new region is initially placed in the upper-left corner of the icon, but may be dragged to a new location.
- Clear
- Clears the selected region, filling it with the current background color. If no region is selected, the entire icon is cleared.
- Select All
- Select all icon regions.
View menu commands
The View menu (see Figure 28-26) contains commands to set view magnification and to set grid options.
[Figure 28-26 Cursor editor View menu
- Zoom 1
- Sets the current view's zoom factor to 1 (normal size).
- Zoom 2
- Sets the current view's zoom factor to 2 (twice normal size).
- Zoom 4
- Sets the current view's zoom factor to 4 (four times normal size).
- Zoom 8
- Sets the current view's zoom factor to 8 (eight times normal size).
- Grid
- Turns on the grid. The grid is only visible in views where the zoom factor is 4 or 8.
- Button Grid
- Turns on the button grid.
- Grid Settings
- Opens the Grid Settings dialog box (see Figure 28-27), used to set
grid options.

[Figure 28-27 Grid Settings dialog box
Pixel grid
Turns on display of the pixel grid.Button grid
Turns on display of the button grid. The spacing of points on the button grid can be specified in the Width and Height fields.
Tool menu commands
The Tool menu (see Figure 28-28) lets you select drawing tools. While over the drawing area, the cursor changes shape to indicate the currently selected tool. To draw, click or click and drag (as appropriate) in the drawing area. Using the right button rather than the left reverses the roles of foreground and background colors. Drawing tools can also be selected in the toolbox. Drawing operations are identical to those in the Bitmap editor.For more information, see Chapter 7, "Adding Look and Feel with Resources."
[Figure 28-28 Icon editor Tool menu
- Brush
- Selects the brush tool.
- Erase
- Selects the eraser tool.
- Eye Drop
- Selects the eye-dropper tool. Use this tool to select foreground and background colors directly from the image.
- Line
- Selects the straight line tool.
- Text
- Selects the text tool.
- Oval
- Selects the hollow oval tool.
- Oval (Filled)
- Selects the solid oval tool.
- Paint
- Selects the paint can (flood fill) tool.
- Pen
- Selects the pen (pencil) tool.
- Rect
- Selects the hollow rectangle tool.
- Rect (Filled)
- Selects the solid rectangle tool.
- Round Rect
- Selects the hollow rounded rectangle tool.
- Round Rect (Filled)
- Selects the solid rounded rectangle tool.
- Select
- Selects the Selection tool. Use this tool to select rectangular regions for cut, copy, clear, drag, flip, and invert operations.
- Spray
- Selects the spray brush (airbrush) tool.
Image menu commands
Commands in the Image menu (see Figure 28-29) perform simple image manipulation functions. To select a region to flip or invert, select the Selection tool from the toolbox or from the Tool menu, then drag a box around the region. If no region is selected, these commands operate on the entire icon.

[Figure 28-29 Icon editor Image menu
- Flip Vertically
- Flips the selected region vertically.
- Flip Horizontally
- Flips the selected region horizontally.
- Invert Colors
- Inverts the colors in the selected region (for example, in a 16 color icon, color 0 is replaced with color 15, color 1 is replaced with color 14, and so on).
Toolbar commands
The Icon editor toolbar (see Figure 28-30) provides quick access to frequently-used menu commands.

[Figure 28-30 Icon editor toolbar
- Undo:
- Same as choosing Undo from the Edit menu. Right-click on this button to undo multiple operations at once.
- Redo:
- Same as choosing Redo from the Edit menu. Right-click on this button to redo multiple operations at once.
- Cut:
- Same as choosing Cut from the Edit menu.
- Copy:
- Same as choosing Copy from the Edit menu.
- Paste:
- Same as choosing Paste from the Edit menu.
- Flip horizontally:
- Same as choosing Flip Horizontally from the Image menu.
- Flip vertically:
- Same as choosing Flip Vertically from the Image menu.
- Invert colors:
- Same as choosing Invert Colors from the Image menu.
Toolbox
The Icon editor toolbox (see Figure 28-31) provides quick access to the tools available in the Tool menu. The toolbox also lets you select foreground and background colors, brush types, background pattern, and line type.
[Figure 28-31 Icon editor toolbox
The toolbox is slightly different from the toolbox used in the Bitmap editor. In addition to the usual color palette, two extra colors are available: Transparent and Inverted. Transparent is used to draw areas in the cursor where the background screen color shows through. Inverted is used to draw areas in the cursor where the background screen color is bitwise-complemented.
Other than these two additions, the Icon editor toolbox is identical to the Bitmap editor toolbox. For more information on the Bitmap editor toolbox, see Chapter 7, "Adding Look and Feel with Resources."
Icon properties
Icon properties are shown in Figure 28-32.
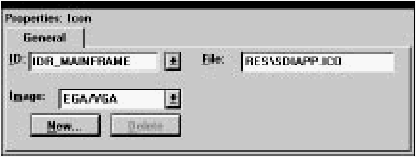
[Figure 28-32 Icon properties
Specify a filename for the icon resource in the File textbox. The Image field specifies which of the icons in the icon resource is currently displayed. Click on New to create a new icon in the current resource, or click on Delete to delete the current icon from the resource. Note that you cannot delete the last icon from the resource.
Font Editor
The Font editor (see Figure 28-33) is used to edit font resources.
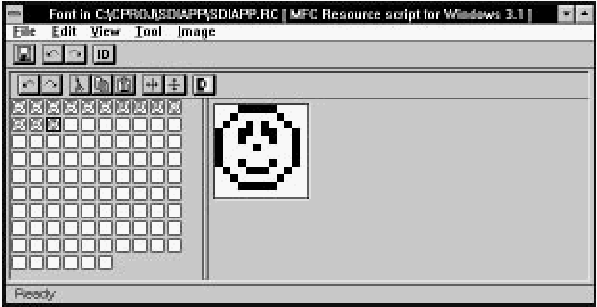
[Figure 28-33 The Font editor
Unlike the Bitmap editor, the two views in the Font editor are not equivalent. The left pane displays each of the character bitmaps in the font at normal size. To select a bitmap for editing, click on it in the left pane. The current bitmap is edited in the right pane, which functions in the same way as a pane in the Bitmap editor.
Otherwise, the Font editor functions much like the Bitmap editor. Drawing tools are selected by choosing commands in the Tool menu, or by clicking on the tool in the toolbox. Colors are selected in the palette section of the toolbox (font bitmaps are monochrome, so only two colors are available). The View menu is used to zoom the editing view and to turn on the grid. Simple image manipulation functions are available in the Image menu.
FontExpress
As a new font is created, the FontExpress dialog box opens (see Figure 28-34). This dialog box is used to set initial font properties.

[Figure 28-34 FontExpress
The most important option to specify is the point size. While most of the other options can be easily changed at a later time, a change in the font height may require redrawing any characters you have drawn so far. All of the character bitmaps in the font have the same height.
The Proportional option enables setting the horizontal size of each character independently.
File menu commands
The File menu (see Figure 28-35) contains commands to save the resource file, to edit resource IDs, and to perform other miscellaneous functions.

[Figure 28-35 Font editor File menu
- Save
- Saves the resource file. If the file is unnamed, this command executes Save As.
- Save As
- Opens a Windows File Save As dialog box, which can be used to save the resource file under a new name.
- Export Resource
- Opens a dialog box which can be used to save the font in a separate file.
- Export Resource IDs
- Opens the Resource ID Browser dialog box, used to browse and modify resource IDs. For more information about managing resource IDs and using the Resource ID Browser dialog box, see "Managing Resource IDs," in Chapter 7, "Adding Look and Feel with Resources."
- Class Express
- Runs ClassExpress, passing the filename of the resource file as the project that ClassExpress should open. This command is only enabled if the Font editor is running in the right pane of the Browser window.
- Close Editing
- Closes the Font editor.
Edit menu commands
The Edit menu (see Figure 28-36) contains standard editing commands. You can undo operations, and can cut, copy, paste, and clear rectangular regions of the character bitmap. To select a region to cut, copy, or clear, select the Selection tool from the toolbox or from the Tool menu, then drag a box around the region.
[Figure 28-36 Font editor Edit menu
- Undo
- Undoes the last Font editor operation.
- Redo
- Redoes the last undone Font editor operation.
- Cut
- Copies the selected region to the Clipboard, then clears the region in the character bitmap, filling it with the current background color.
- Copy
- Copies the selected region to the Clipboard.
- Paste
- Copies the region in the Clipboard to the character bitmap. The new region is initially placed in the upper-left corner of the bitmap, but may be dragged to a new location.
- Clear
- Clears the selected region, filling it with the current background color. If no region is selected, the entire bitmap is cleared.
- Select All
- Select all bitmap regions.
View menu commands
The View menu (see Figure 28-37) contains commands to set editing view magnification and to set grid options.

[Figure 28-37 Font editor View menu
- Zoom 1
- Sets the editing view's zoom factor to 1 (normal size).
- Zoom 2
- Sets the editing view's zoom factor to 2 (twice normal size).
- Zoom 4
- Sets the editing view's zoom factor to 4 (four times normal size).
- Zoom 8
- Sets the editing view's zoom factor to 8 (eight times normal size).
- Grid
- Turns on the grid. The grid is only visible when the editing view zoom factor is 4 or 8.
- Button Grid
- Turns on the button grid.
- Grid Settings
- Opens the Grid Settings dialog box (see Figure 28-38), used to set
grid options.
[Figure 28-38 Grid Settings dialog box
Pixel grid
Turns on display of the pixel grid.Button grid
Turns on display of the button grid. The spacing of points on the button grid can be specified in the Width and Height fields.
Tool menu commands
The Tool menu (see Figure 28-39) lets you select drawing tools. While over the drawing area, the cursor changes shape to indicate the currently selected tool. To draw, click or click and drag (as appropriate) in the drawing area. Using the right button rather than the left reverses the roles of foreground and background colors. Drawing tools can also be selected in the toolbox. Drawing operations are identical to those in the Bitmap editor.For more information, see Chapter 7, "Adding Look and Feel with Resources."
[Figure 28-39 Font editor Tool menu
- Brush
- Selects the brush tool.
- Erase
- Selects the eraser tool.
- Eye Drop
- Selects the eye-dropper tool. Use this tool to select foreground and background colors directly from the image.
- Line
- Selects the straight line tool.
- Text
- Selects the text tool.
- Oval
- Selects the hollow oval tool.
- Oval (Filled)
- Selects the solid oval tool.
- Paint
- Selects the paint can (flood fill) tool.
- Pen
- Selects the pen (pencil) tool.
- Rect
- Selects the hollow rectangle tool.
- Rect (Filled)
- Selects the solid rectangle tool.
- Round Rect
- Selects the hollow rounded rectangle tool.
- Round Rect (Filled)
- Selects the solid rounded rectangle tool.
- Select
- Selects the Selection tool. Use this tool to select rectangular regions for cut, copy, clear, drag, flip, and invert operations.
- Spray
- Selects the spray brush (airbrush) tool.
Image menu commands
Commands in the Image menu (see Figure 28-40) perform simple image manipulation functions. To select a region to flip or invert, select the Selection tool from the toolbox or from the Tool menu, then drag a box around the region. If no region is selected, these commands operate on the entire character bitmap.

[Figure 28-40 Font editor Image menu
- Flip vertically
- Flips the selected region vertically.
- Flip horizontally
- Flips the selected region horizontally.
- Invert colors
- Inverts the colors in the selected region. Black is changed to white, and white to black.
Toolbar commands
The Font editor toolbar (see Figure 28-41) provides quick access to frequently used menu commands.

[Figure 28-41 Font editor toolbar
- Undo:
- Same as choosing Undo from the Edit menu. Right-click on this button to undo multiple operations at once.
- Redo:
- Same as choosing Redo from the Edit menu. Right-click on this button to redo multiple operations at once.
- Cut:
- Same as choosing Cut from the Edit menu.
- Copy:
- Same as choosing Copy from the Edit menu.
- Paste:
- Same as choosing Paste from the Edit menu.
- Flip horizontally:
- Same as choosing Flip Horizontally from the Image menu.
- Flip vertically:
- Same as choosing Flip Vertically from the Image menu.
- Invert colors:
- Same as choosing Invert Colors from the Image menu.
Toolbox
The Font editor toolbox (see Figure 28-42) provides quick access to the tools available in the Tool menu. The toolbox also lets you select foreground and background colors, brush types, background pattern, and line type.

[Figure 28-42 Font editor toolbox
The only difference between the Font editor toolbox and the Bitmap editor toolbox is that (since font character bitmaps are monochrome) only two colors are ever displayed in the Font editor toolbox palette. For more information on the Bitmap editor toolbox, see Chapter 7, "Adding Look and Feel with Resources."
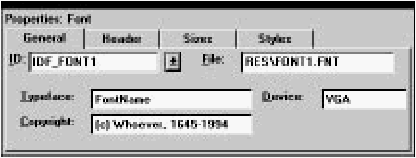
Font properties
Fonts have four pages of properties. The General properties are shown in Figure 28-43.
[Figure 28-43 Font General properties
Specify a filename for the font in the File textbox.
Header properties of a font are shown in Figure 28-44.
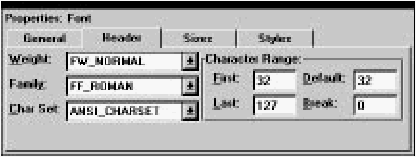
[Figure 28-44 Font Header properties
Sizes properties of a font are shown in Figure 28-45.

[Figure 28-45 Font Sizes properties
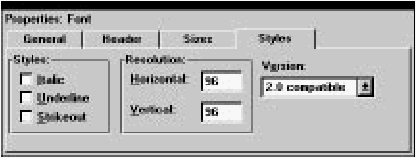
Styles properties of a font are shown in Figure 28-46.
[Figure 28-46 Font Styles properties