


19. Class Editor Reference
This chapter describes menu operations and mouse functions available in the Class Editor. For an introduction to this tool, see Chapter 5, "Defining Classes and Their Hierarchies."The Class Editor Window
There are several ways to open a Class Editor window:- Choose Class Editor from the Goto View submenu of the IDDE's Window menu.
- Double-click on the Class Editor icon in the Views toolbox, or drag the icon from the toolbox to the desktop.
- Choose New! from another Class Editor window's menu bar.
- Double-click on a class in the Hierarchy Editor graphical display.
- In the Class pane, move the cursor towards the left margin until its orientation changes and it points to the right. Then highlight one or more classes and drag them onto the desktop.
- In the Members pane, move the cursor towards the left margin until its orientation changes and it points to the right. Then highlight one or more members and drag them onto the desktop.
- Double-click on an entry in the Query Implementors window.
- In the Query Implementors window, move the cursor towards the left margin until its orientation changes and it points to the right. Then highlight one or more entries and drag them onto the desktop.
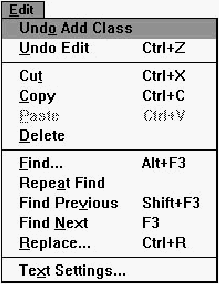
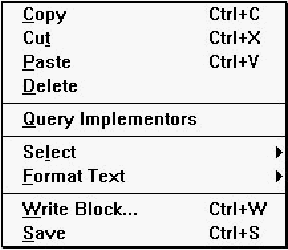
Edit menu commands
With one exception, the commands in the Edit menu (Figure 19-1) operate on text in the Source pane and are identical in function to the corresponding Edit menu commands in Source windows. For a description, see Chapter 21, "Text Editor Reference."
[Figure 19-1 Edit menu commands
Global Undo
Cancels the last operation performed in the Class Editor or Hierarchy Editor (such as Add Class or Add Member). The text of this menu item changes to reflect the previous operation performed in the Class Editor.Goto menu commands
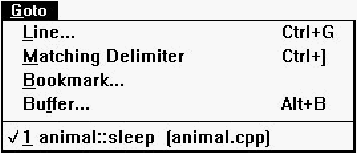
The commands in the Goto menu (Figure 19-2) are used to move around within the Source pane and are identical to the corresponding Goto menu commands in Source windows. For a description, see Chapter 21, "Text Editor Reference."
[Figure 19-2 Goto menu commands
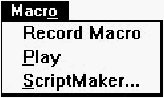
Macro menu commands
The commands in the Macro menu (Figure 19-3) are identical to Macro menu commands in Source windows. For a description, see Chapter 21, "Text Editor Reference."
[Figure 19-3 Macro menu commands
New! command
This command opens another Class Editor window.Classes pane pop-up menu commands
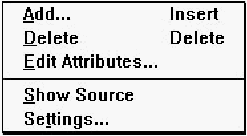
The Classes pane pop-up menu (Figure 19-4) contains commands to add and modify classes and inheritance relationships, and to access Class Editor options.
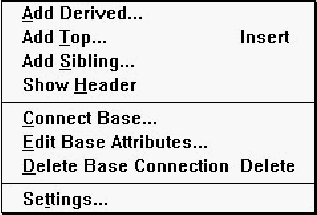
[Figure 19-4 Classes pane pop-up menu commands
Add Derived
Opens a dialog box (Figure 19-5) that lets you add a new class to the hierarchy. The new class is a derived class of the currently selected class(es), whose name is shown in the dialog box's title.
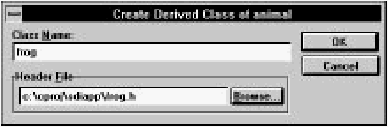
[Figure 19-5 Create Derived Class dialog box
Class name
Specifies a name for the new class.Header file
Contains the name of the header file into which the class declaration is placed. By default, the first eight characters of the class name (with .h appended) are used as the header file name. You may type an alternative filename into the textbox, or click on Browse to select a filename from the Class Header File dialog box.Add Top
Adds a top-level (baseless) class. The dialog box that opens as a result of selecting this command is identical in function to the one that opens when you choose the Add Derived command.Add Sibling
Adds a class that is a sibling of (derived from the same base class as) the currently selected class. The dialog box that opens as a result of selecting this command is identical in function to the one that opens when you choose the Add Derived command. You cannot add siblings to classes with multiple base classes.Show Header
Opens a new Source window to edit the header file containing the declaration of the currently selected class.Note: You can also perform this action by moving the cursor towards the left margin of the Class pane until its orientation changes and it points to the right. Then select a class and drag it onto the desktop while holding down the Control key.
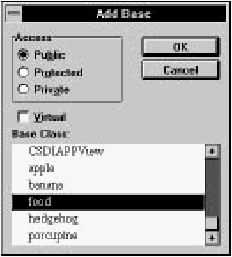
Connect Base
Opens the Add Base dialog box (Figure 19-6) that lets you add a base class to the selected class.
[Figure 19-6 Add Base dialog box
Access
These options indicate the base class access specifier:- Public:
- Public members of the base class are public members of the derived class, and protected members of the base class are protected members of the derived class.
- Protected:
- Public and protected members of the base class are protected members of the derived class.
- Private:
- Public and protected members of the base class are private members of the derived class.
Virtual
Specifies the base class to be virtual.Base class
Specifies the class that is made a base of the selected class. You can select more than one class to make a base class by holding down the Control key while clicking on the class name, or by holding down the Shift key while selecting a range of classes.Edit Base Attributes
Opens the Edit Base Attributes dialog box (Figure 19-7) with which you change the attributes of the connection between the selected class and its base class.This command is disabled if classes are sorted alphabetically rather than hierarchically.
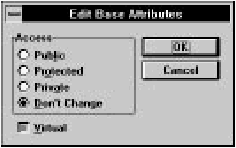
[Figure 19-7 Edit Base Attributes dialog box
Access
These options indicate the base class access specifier:- Public:
- Public members of the base class are public members of the derived class, and protected members of the base class are protected members of the derived class.
- Protected:
- Public and protected members of the base class are protected members of the derived class.
- Private:
- Public and protected members of the base class are private members of the derived class.
- Don't change:
- Appears only if you are editing the attributes of more than one connection and the base class access specifiers are not all identical. It means that the base class access specifiers are not altered. It lets you change the Virtual specifier of all connections without affecting their individual access specifiers.
Virtual
If selected, this option specifies the base class to be virtual. If grayed, the virtual setting is left unchanged.If the selected class is derived from multiple bases, only the attributes of the connection with the base class immediately above in the Classes pane are changed.
Delete Base Connection
Deletes the connection between the selected class and its base class. If the class is derived from multiple bases, only the connection with the base class immediately above it in the Classes pane is removed.You will be prompted to confirm this if the Confirm Inheritance Changes option on the General page of the Editing/Browsing Settings dialog box is selected.
This command is disabled if classes are sorted alphabetically rather than hierarchically.
Settings
Opens the Editing/Browsing Settings dialog box, in which you set general Class Editor and text editor options. Details of this dialog box are discussed in "Class Editor Settings," later in this chapter.Members pane pop-up menu commands
The Members pane pop-up menu (Figure 19-8) contains commands to add, delete, and modify class members, and to access Class Editor options.
[Figure 19-8 Members pane pop-up menu commands
Add
Opens the Add Member dialog box (Figure 19-9). The new member is added to the class whose members are currently displayed in the Members pane.

[Figure 19-9 Add Member dialog box
Access
These options specify the member access control:- Public:
- Public members are accessible from outside the member's class.
- Protected:
- Protected members are accessible only within the member's class, derived classes, and their friends.
- Private:
- Private members are accessible only within the member's class and its friends.
Storage
These options specify the member storage class:- Normal:
- The member has no storage modifiers.
- Static:
- Only one copy of the member exists; it is shared by all objects of the member's class.
- Virtual (functions only):
- The function may be overridden in derived classes.
- Pure virtual (functions only):
- The function must be overridden in derived classes; the class is abstract.
- Friend (functions only):
- The named function is allowed access to the class's private and protected members.
Inline
Requests inline implementation of a function. Causes its definition to be placed in the .h file.Declaration
Contains the member declaration. For data items, enter the type and member name (for example, int nCats). For functions, enter the return type, function name, and argument types (for example, void AddCats(int)). Do not precede the declaration with storage specifiers; use the option buttons above. Trailing semicolons are optional.Source file
Contains the name of the source file into which the member definition is placed. By default, the first eight characters of the class name (with .cpp appended) are used as the source file name. You may type an alternative filename into the textbox, or click on Browse to select an alternative filename from the Member Source File dialog box.The member declaration is placed in the class declaration. If the specified source file does not already exist, it is created and added to the project. By default, empty definitions of inline functions are placed in the header file. Empty definitions of normal, static, and virtual functions, as well as static data members, are placed in the source file.
Delete
Deletes the currently selected member. If the Confirm Member Delete option on the General page of the Editing/Browsing Settings dialog box is selected, you are asked to confirm the deletion. The member's declaration and definition (if applicable) are removed from the header and source files.Edit Attributes
Opens the Change Member Attributes dialog box (Figure 19-10), which you use to edit access and storage specifiers of the selected member.
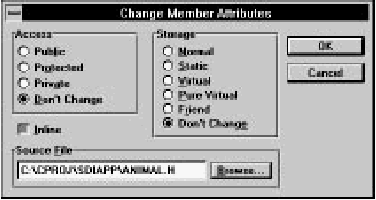
[Figure 19-10 Change Member Attributes dialog box
Access
These options specify the member access control:- Public:
- Public members are accessible from outside the member's class.
- Protected:
- Protected members are accessible only within the member's class, derived classes, and their friends.
- Private:
- Private members are accessible only within the member's class and its friends.
- Don't change:
- Only appears if you are editing the attributes of more than one member and their access controls are not all identical. It means that the access control is not altered. It lets you change other member attributes without also affecting their individual access controls.
Storage
These options specify the member storage class:- Normal:
- The member has no storage modifiers.
- Static:
- Only one copy of the member exists; it is shared by all objects of the member's class.
- Virtual (functions only):
- The function may be overridden in derived classes.
- Pure virtual (functions only):
- The function must be overridden; the class is abstract.
- Friend (functions only):
- The named function is allowed access to the class's protected and private members.
- Don't change:
- Only appears if you are editing the attributes of more than one member and their storage classes are not all identical. It means that the storage class is not altered. It lets you change other member attributes without affecting their individual storage classes.
Inline
Requests inline implementation of a function. If grayed, the current setting is left unchanged.Source file
If applicable, this option contains the name of the source file holding the member definition. You may change the filename in the textbox, or click on Browse to select an alternative filename from the Member Source File dialog box.Show Source
Opens a new Source window to show the source file containing the definition of the currently selected member.If you add new functions or static data definitions to the source file or alter function argument or return types, you must update the class header to reflect the changes.
Settings
Opens the Editing/Browsing Settings dialog box that lets you set general Class Editor and text editor options. Details of this dialog box are discussed in "Class Editor Settings," later in this chapter.Source pane pop-up menu commands
With one exception, commands in the Source pane pop-up menu (Figure 19-11) are identical to the corresponding commands in Source windows. For a description, see Chapter 21, "Text Editor Reference."
[Figure 19-11 Source pane pop-up menu commands
Save
Saves the program code shown in the Source pane and places it in the appropriate source or header file.Changes to static data and to function argument and return types made in the source code are updated automatically in the class declaration and Members pane.
Class editor mouse functions
The mouse is used to select classes and members, perform editing operations, open pop-up menus, and change the relative sizes of Class Editor panes. As mentioned in "The Class Editor Window" above, drag and drop operations are supported.To resize the panes, first position the cursor over the dividing line between panes. The cursor changes to a two-headed arrow. Then, press the left mouse button and drag the separator to the desired location.
Classes pane
The right mouse button opens the pop-up menu (see "Classes pane pop-up menu commands," earlier in this chapter).Select a class by clicking on it. Several classes may be selected by clicking on each one while holding down Control. The members of the class last selected appear in the Members pane. You may drag and drop a class into the source pane; the class name is inserted into the buffer.
Members pane
The right mouse button opens the pop-up menu (see "Members pane pop-up menu commands," earlier in this chapter).Select a member by clicking on it. Several members may be selected by clicking on each one while holding down Control.
Double-clicking on a member causes its definition (if appropriate) or declaration to appear in the Source pane. If the source is not available, the declaration is displayed.
You may drag and drop a member into the source pane; the member declaration is inserted into the buffer.
Note: In addition to clicking on it, you can select a member when the Members pane is active by typing its name. As you type, the Class Editor attempts to automatically complete the name. (Depending on the rate at which you type, it may consider a character to be the first character of a new selection, rather than the next character in the current select operation.)
Source pane
The right mouse button opens the pop-up menu (see "Source pane pop-up menu commands," earlier in this chapter).The source pane supports typical Source window mouse and cursor operations, as described in Chapter 21, "Text Editor Reference."
Toolbar commands
The Class Editor toolbar (Figure 19-12) offers quick access to several menu options.
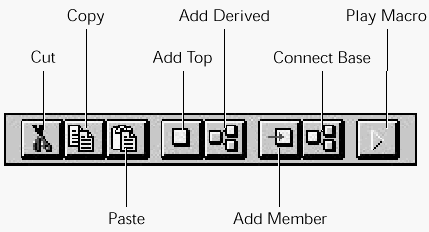
[Figure 19-12 Class Editor toolbar
These options are the same as those in other menus:
- Cut:
- Same as choosing Cut from the Edit menu.
- Copy:
- Same as choosing Copy from the Edit menu.
- Paste:
- Same as choosing Paste from the Edit menu.
- Add top:
- Same as choosing Add Top from the Classes pane pop-up menu.
- Add derived:
- Same as choosing Add Derived from the Classes pane pop-up menu.
- Add member:
- Same as choosing Add from the Member pane pop-up menu.
- Connect base:
- Same as choosing Connect Base from the Classes pane pop-up menu.
- Play macro:
- Same as choosing Play from the Macro menu.
Class Editor Settings
You can access Class Editor settings by choosing Text Settings from the Edit menu, or Settings from the Classes or Members pane pop-up menus. These commands open the Editing/Browsing Settings dialog box, a workspace with tabs along the top margin. The tabs are used to switch between several sets of options. The Class, Member, and General options are discussed in this section; the remaining options pertain to text editing and are discussed in Chapter 21, "Text Editor Reference."General options
The General options set (Figure 19-13) contains options for undo levels, class/member bar confirmations, output window actions, and key bindings, as well as some options related to the text editor.

[Figure 19-13 General options
Browser operations
Specifies the number of operations that can be undone in the Class and Hierarchy Editors with the Global Undo command.Text edits, per buffer
Specifies the number of edit operations that can be undone, per buffer.Confirmations
These options enable confirmation requests for various operations in the Class and Hierarchy Editors. You can enable confirmations of:- Member deletions
- Inheritance changes
Open output window on message
Lets the IDDE open an error window whenever there is an error of any kind (during compilation, during parsing, and so on.)Keyboard emulation file
Specifies the key bindings set to be used by the text editor.Multiple selections
This option enables multiple selections in lists in the Class and Hierarchy editors:- Yes:
- Multiple selections are allowed.
- No:
- Multiple selections are not allowed.
- Confirm:
- Multiple selections are allowed, but a confirmation request is displayed each time an operation is performed on multiple classes or members.
Class options
The Class options set (Figure 19-14) lets you specify the display order and font of classes in the Classes pane.
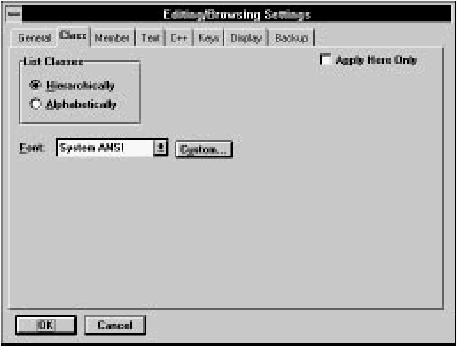
[Figure 19-14 Class options
List classes
This option defines how classes are arranged in the Classes pane:- Hierarchically:
- Base classes are arranged alphabetically, with derived classes placed below and indented relative to their base classes. If a class has multiple bases, that class is listed below each base class.
- Alphabetically:
- Classes are arranged in alphabetical order, and each class is listed only once.
Font
Specifies the font used to display class names in the Classes pane. You can select a predefined font from the drop-down list, or you may click on Custom and select any installed font from a Windows Font dialog box.Apply here only
Indicates that the settings specified here should be applied only to the current Class Editor window.Member options
The Member options set (Figure 19-15) lets you specify the display parameters of class members in the Members pane.
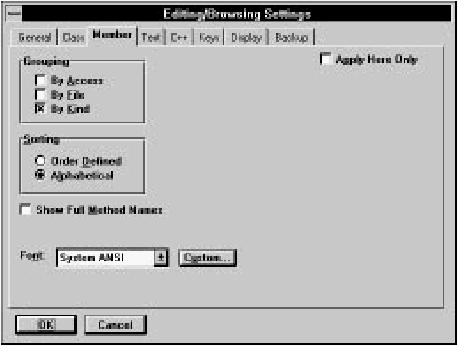
[Figure 19-15 Member options
Grouping
This option indicates how class members are grouped. Any or all of the following options may be selected:- By access:
- Members are grouped into Public, Protected, and Private. If By Access is not selected, each member is preceded by a colored diamond indicating its access specifier (green for public, yellow for protected, red for private).
- By file:
- Members are grouped by the source file containing their definitions. When this option is selected, only functions and static data are shown.
- By kind:
- Members are grouped into Data, Functions, and Typedefs. If more than one Grouping option is selected, members are grouped by kind within files, and by files within access category.
Sorting
This option indicates how members are arranged within each group:- Order defined:
- Members are arranged in the order they are declared in the class header.
- Alphabetical:
- Members are arranged alphabetically.