


21. Text Editor Reference
This chapter describes commands and options available in the text editor, including global search functions, key binding options, and macro functions. For an introduction to text editing, see Chapter 6, Editing Program Code.The Source Window
To open a Source window, you have several choices:- Choose New or Open from the IDDE's File menu.
- Choose Source from the Goto View submenu of the IDDE's Window menu.
- Double-click on the Source icon in the Views toolbox, or drag the icon from the toolbox to the desktop.
- Double-click on a filename in the Project window.
- Choose Show Source or Show Header from pop-up menus in the Class and Hierarchy Editors.
- Double-click on an error message in the Error window.
- Choose New or Open from another Source window's File menu.
- Choose New! from another Source window's menu bar.
- Select text in one Source view, then drag it onto the desktop. This results in an untitled Source window containing the selected text.
File menu commands
The File menu (Figure 21-1) contains commands to open, save, and print files, as well as other useful file-related commands. Note that the Save and Add to Project command changes to Add to Project, Save and Parse, or Parse, depending on whether the file is part of the project, up to date, or parsed.
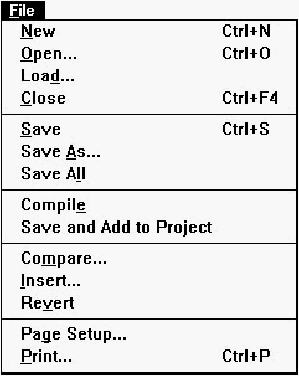
[Figure 21-1 File menu commands
New
Opens a new, empty, and untitled Source window.Open
Opens a Windows File Open dialog box, then creates a new Source window containing the selected file. If the Open command is chosen from an untitled, unmodified Source window, the selected file is opened in that Source window.Load
Opens a Windows File Open dialog box, then loads the selected file into the current Source window. If there are unsaved changes in the previous file, you are asked if you would like to save the changes before loading the new file.Close
Closes the Source window. If there are unsaved changes, you are asked if you would like to save the changes before closing the file.Save
Saves the current buffer to disk. If the file is untitled, this command executes Save As.Save as
Saves the current buffer using the Windows File Save As dialog box. This dialog box contains a check box- Add to Project, which lets you add the file to the current project.Save All
Executes Save for every open Source window.Compile
Saves the buffer and compiles the file.Save and Add to Project
Saves the file to disk, adds the file to the project, and reparses all files in the project.The Save and Add to Project command changes to Add to Project, Save and Parse, or Parse, depending on whether the file is part of the project, up to date, or parsed. These are the four changes:
- A new source file is created but not saved, or flagged as modified since the last save. The menu reads "Save and Add to Project."
- A source file which has not been added to the project is saved. The menu reads "Add to Project."
- A source file which exists in a project is loaded in the source editor. The menu reads "Parse."
- A source file exists in a project and has been flagged or modified. The menu read "Save and Parse."
Add to Project
Adds the file to the project and reparses all files in the project.Save and Parse
Saves the file to disk and reparses all files in the project.Parse
Reparses all files in the project.Compare
Opens the Compare Files dialog box (Figure 21-2), which lets you select two files to compare.
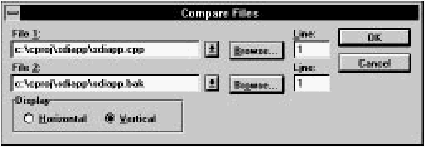
[Figure 21-2 Compare Files dialog box
File 1 and File 2
Specifies the files to be compared. You may type the file names, select names from the drop-down lists, or click on Browse to select files from standard Windows filename dialog boxes.If either file is open in a Source window, the editor uses the version in memory rather than the one in the disk file.
Line
Specifies the line number at which the comparison starts.Display
Specifies the arrangement of the windows in which the two files are displayed:- Horizontal:
- The files are displayed one above the other.
- Vertical:
- The files are displayed side-by-side.
The editor performs the comparison on a line-by-line basis. When it
finds a mismatch, it highlights the appropriate lines in both files. The
Compare dialog box (Figure 21-3) indicates where the mismatch
was found.
[Figure 21-3 Compare dialog box showing mismatch
- Next match:
- Click on this button to resynchronize the
comparison. The editor highlights the next set of matching lines
and the Compare dialog box indicates where the match occurs.
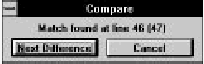
[Figure 21-4 Compare dialog box showing match
- Next difference:
- Click on this button to find the next mismatched line. You can continue the comparison in this way until no more differences are found.
Insert
Opens an Insert File dialog box. The editor inserts the contents of the file you select at the current insertion point.Revert
Rereads the file from disk, abandoning any changes made since the last time it was saved.Page Setup
Opens the Page Setup dialog box (Figure 21-5), which sets parameters for printing.
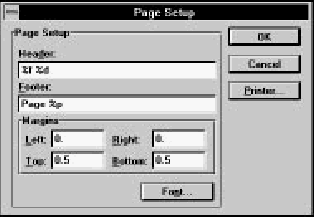
[Figure 21-5 Page Setup dialog box
Header and footer
The header and footer are single lines of text displayed at the top and bottom (respectively) of each page of the printed output. To omit the header or footer, leave the textbox empty.You can embed the following special-purpose codes in the header and footer text:
- %f gives the full path and filename of active file
- %d gives the current date and time
- %p gives the current page number
Margins
Sets the page margins. The units are the standard units of measurement used in your country (inches or centimeters), set in the Windows Control Panel.Font
Opens a Windows Font dialog box, with which you select a typeface, style, and size for the printed output. The entire document, including headers and footers, is shown in the selected font.Printer
Opens a Windows Print Setup dialog box, with which you can set additional printing parameters.
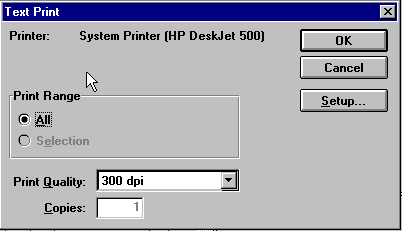
[Figure 21-6 Text Print dialog box
Print range
Specifies whether the entire file or just the current text selection is printed:- All:
- Prints the entire file.
- Selection:
- Prints the highlighted text selection. (It is disabled if no text is selected.)
Print quality
This drop-down listbox specifies print quality. Options include the specified printer's output capabilities, expressed in dots per inch.Copies
Specifies the number of copies to print.Setup
Opens a Windows Print Setup dialog box, with which you can set additional printing parameters.Edit menu commands
The Edit menu (Figure 21-7) contains standard edit and search commands, as well as commands to access text editor options.
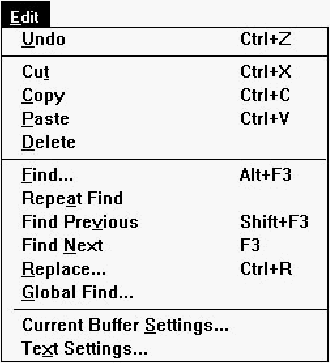
[Figure 21-7 Edit menu commands
Undo
Reverses the last cut, paste, replace, or typed character. By repeatedly choosing this command, you can undo previous commands, up to the limit of the undo buffer.Cut
Copies the selected text to the Clipboard, then deletes it from the buffer.Copy
Copies the selected text to the Clipboard.Paste
Inserts the text from the Clipboard at the insertion point.Delete
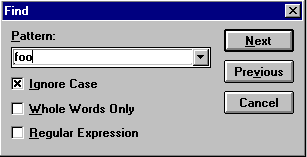
Deletes the selected text from the buffer.Find
Opens the Find dialog box (Figure 21-8), used to search the file for specified text.
[Figure 21-8 Find dialog box
Pattern
This drop-down listbox contains the text to be found.You can initialize the pattern by selecting the text before choosing Find. (The text must not span a line break.) Otherwise, you may type the text you want to find into the textbox, or select text from previous search strings, stored in the drop-down listbox.
The pattern may also be a regular expression (text containing wildcard characters) if the Regular Expression option is selected. Regular expression syntax is discussed in "Using Global Find," later in this chapter.
Ignore case
If this option is turned on, the search is not case sensitive.Whole words only
If this option is turned on, a string is considered a match only if it is not part of a larger alphanumeric string.Regular expression
This option enables regular expression matching.The search begins at the current insertion point. Click Next to search forward in the file, or Previous to search backward in the file. If the search is successful, the matching text is highlighted. Otherwise, the status line displays the message "Pattern not found."
Repeat Find
Continues the search begun by Find. The search resumes from the current insertion point and proceeds in the direction previously specified.If the search is successful, the matching text is highlighted. Otherwise, the status line displays the message "Pattern not found."
Find Previous
Searches backward from the current insertion point for the text to be found.Find Next
Searches forward from the current insertion point for the text to be found.Replace
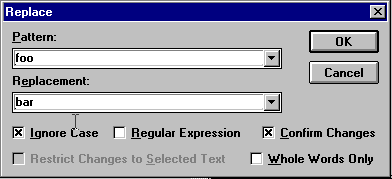
Opens the Replace dialog box (Figure 21-9), which lets you find and replace occurrences of text with different text.
[Figure 21-9 Replace dialog box
Pattern
This drop-down listbox contains the text to be found and replaced.You can initialize the pattern by selecting text before choosing Replace. (The text must not span a line break.) Otherwise, you may type the text you want to find into the textbox, or select text from previous search strings, stored in the drop-down listbox.
The pattern may also be a regular expression (text containing wildcard characters) if the Regular Expressions option is selected. Regular expression syntax is discussed in the section "Using Global Find," later in this chapter.
Replacement
This drop-down listbox contains the text with which you replace occurrences of Pattern. Type the replacement text into the textbox, or select text from previous replacement strings, stored in the drop-down listbox.Ignore case
If this option is turned on, the search is not case sensitive.Regular expressions
Enables regular expression matching.Confirm changes
Causes the text editor to request confirmation before each replacement. If this option is not selected, the editor replaces all occurrences of Pattern, starting at the current insertion point, without prompting you.Restrict changes to selected text
Instructs the text editor to perform replacements only within the selected block of text.Whole words only
If selected, the text editor considers text a match only if it is not part of a larger alphanumeric string.The search/replace operation begins at the current insertion point. If you have selected Confirm Changes, the Confirm Replacement dialog box (Figure 21-10) is displayed when a match is found.
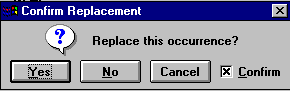
[Figure 21-10 Confirm Replacement dialog box
You may click Yes to make the replacement, No to skip this replacement, or Cancel to end the search/replace operation. Also, if you uncheck Confirm, then click Yes, the editor replaces all remaining occurrences of Pattern without prompting you.
Global Find
Opens the Global Find dialog box. See "Using Global Find," later in this chapter.Current Buffer Settings
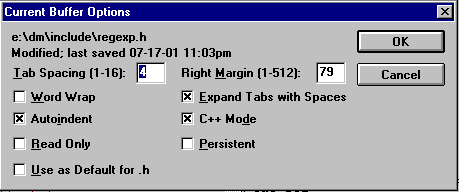
Opens the Current Buffer Options dialog box (Figure 21-11), with which you can change editing options for the current Source window.
[Figure 21-11 Current Buffer Options dialog box
Tab spacing
Specifies the number of columns between tab stops.Right margin
Specifies the column that acts as the right margin.Word wrap
Enables word wrap. While typing, lines extending beyond the right margin are broken automatically at the last word boundary before the margin.Autoindent
Enables automatic indentation on newline. When you press Enter, the editor positions the cursor directly below the first nonblank character in the previous line.Read only
Sets the read-only flag on the buffer, so the buffer may not be changed.Use as default for ...
Saves the Current Buffer Options settings so they become the defaults for any subsequent file with the same file extension that is loaded. For example, if the file that is currently open is "test. cpp," the check box reads, "Use as default for .cpp." If this is an untitled buffer, the check box is disabled.Expand tabs with spaces
Tabs are inserted into the text as an appropriate number of spaces rather than as tab characters.C++ mode
The buffer is treated as C++ code. Special options for C++ code are set in the Editing/Browsing Settings dialog box.Persistent
Causes the buffer options for this file to be saved during the current IDDE session, even if the file is closed. Otherwise, buffer options are set to their global defaults if a file is closed and reopened.Text Setting
Opens the Editing/Browsing Settings dialog box, in which you set global text editing options. Details of this dialog box are discussed in the "Text Settings" section later in this chapter.Goto menu commands
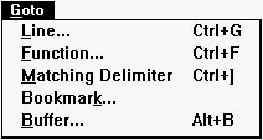
The Goto menu (Figure 21-12) contains commands to move within the source file.
[Figure 21-12 Goto menu commands
Line
Opens the Goto Line dialog box (Figure 21-13). Type the line number and click OK, and the insertion point is moved to the specified line.
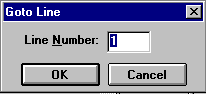
[Figure 21-13 Goto Line dialog box
Function
Opens the Goto Function dialog box (Figure 21-14).
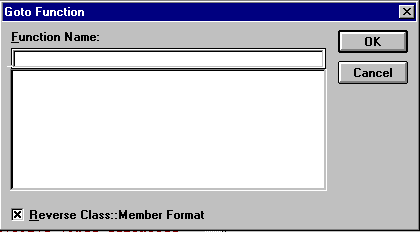
[Figure 21-14 Goto Function dialog box
The Function Name listbox holds the available function names. Either type in the function name or scroll and select the function name from the list. When you click OK, the insertion point moves to the beginning of the specified function.
Member functions in the list typically are displayed as member::class. To change the format to class::member, deselect the Reverse Class::Member Format option.
Matching Delimiter
Finds the delimiter that matches the one to the right of the current insertion point. The insertion point is moved to the front of the matching delimiter. This command can find matching parentheses, square brackets, or braces.Bookmark
Opens the Bookmarks dialog box (Figure 21-15), which you can use to set and move to as many as ten different locations in your source files. Bookmarks are saved through the current IDDE session only.

[Figure 21-15 Bookmarks dialog box
Bookmark list
Shows the locations of the ten bookmarks by file, line, and column. Click on an entry to select it; double-click on an entry to go to it.Goto
Moves the insertion point to the selected bookmark. This command opens a file if it is not already open. You can also double-click on the bookmark in the list.Clear
Removes the selected bookmark.Drop
Sets the selected bookmark to the current insertion point. The entry in the bookmark list is updated to show the file, line, and column.Buffer
Opens the Edit Buffers dialog box (Figure 21-16). This dialog box presents a list of files currently open in Source windows; it allows you to view and change each buffer's editing options and to perform various file-related operations.
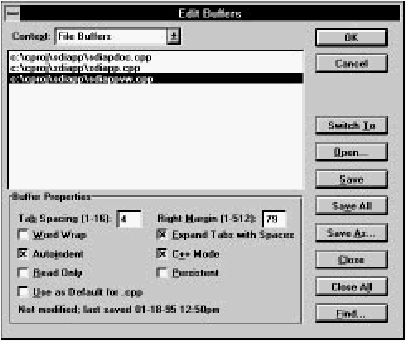
[Figure 21-16 Edit Buffers dialog box
Context
This drop-down listbox specifies File Buffers or Member Buffers. File Buffers are Source windows open to edit an entire file. Member Buffers are Class Editor Source panes and Hierarchy Editor Source child windows, open to edit a particular member definition.Buffer list
Contains the names of files currently open in Source windows (or, if the Member Buffers context is selected, the names of member functions open in Class Editor Source panes and Hierarchy Editor Source child windows). Click on a filename to select it; double-click on it to bring the corresponding Source window to the front.Buffer properties
Lets you view and set options for each individual buffer listed in the buffer list.- Tab spacing:
- Specifies the number of columns between tab stops.
- Right margin:
- Specifies the column that acts as the right margin.
- Word wrap:
- Enables word wrap. While typing, lines that extend beyond the right margin are broken automatically at the last word boundary before the margin.
- Autoindent:
- Causes the text editor to indent automatically on newline. When you press Enter, the editor positions the cursor directly below the first nonblank character in the previous line.
- Read only:
- The buffer may not be changed.
- Use as default for ...:
- Saves the Current Buffer Options settings as the defaults for any subsequent file with the same file extension that is loaded. For example, if the currently open file is test.cpp, the check box reads, "Use as default for .cpp." If the currently open file is test.txt, the check box reads, "Use as default for .txt." If the currently open file has no extension, the check box reads, "Use as default." If this is an untitled buffer, the check box is disabled.
- Expand tabs with spaces:
- Tabs are inserted into the text as an appropriate number of spaces, rather than as tab characters.
- C++ mode:
- Text is treated as C++ code. Special options for C++ code are set in the Editing/Browsing Settings dialog box (see "Text Settings," later in this chapter).
- Persistent:
- Causes the buffer options for this file to be saved during the current IDDE session, even if the file is closed. Otherwise, buffer options are set to their global defaults if a file is closed and reopened.
Switch to
Brings the Source window containing the file selected in the listbox to the front.Open
Opens a Windows File Open dialog box, with which you can select a file to open for editing.Save
Saves the file selected in the listbox. If the file is untitled, this command executes Save As.Save all
Saves all files in the listbox.Save as
Opens a Windows File Save As dialog box, with which you can save the file selected in the listbox under a new name.Close
Closes the file selected in the listbox.Close all
Closes all files in the listbox.Find
Opens the Global Find dialog box (see "Using Global Find," later in this chapter).Macro menu commands
The Macro menu (Figure 21-17) allows you to record, play, and edit macros.
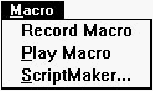
[Figure 21-17 Macro menu commands
Record Macro
Starts the recording of the default macro. While a macro is being recorded, this menu choice is replaced in the menu by Stop Recording. Menu and keystroke recording is limited to the current source window only. To record a macro:- Choose Record Macro. If a default macro exists, you are asked to confirm that you want to record over the default macro. Click OK.
- Enter the sequence of keystrokes and menu selections you want to record.
- Choose Stop Recording to end the macro.
Play Macro
Plays back the default macro.ScriptMaker
Opens the ScriptMaker dialog box (Figure 21-18), with which you copy, name, and edit macros.
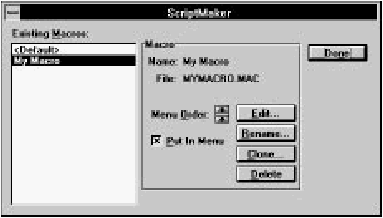
[Figure 21-18 ScriptMaker dialog box
Existing macros
This is the list of macros. Click on a macro to select it; double-click on the macro to edit it.Menu order
These buttons allow you to change the order of the macros listed in the Macro menu. Click on the Up Arrow to move the selected macro up in the menu; click on the Down Arrow to move it down in the menu. The default macro always remains at the top of the list.Put in menu
Causes the selected macro to be listed in the Macro menu.Edit
Opens the Macro Editor window. For information about the macro language and the Macro Editor window, see the Digital Mars C++ IDDE Help.Rename
Opens the Rename/Clone Script dialog box (Figure 21-19), with which you can change the selected macro's menu name or filename.
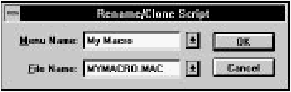
[Figure 21-19 Rename/Clone Script dialog box
- Menu name:
- Name under which this macro is listed in the Macro menu.
- File name:
- Name of the file in which the macro is saved. You can change either or both names. Note that you cannot rename the default macro.
Clone
This button opens the Rename/Clone Script dialog box. This command makes a copy of the selected macro.- Menu name:
- Name under which this macro is listed in the Macro menu.
- File name:
- Name of the file in which the macro is saved. When cloning, this filename must be different from that of any other macro.
Delete
Deletes the selected macro.New! command
Opens another Source window on the current file.Changes made to a file in one Source window are made automatically in other Source windows containing the same file.
Pop-up menu commands
The pop-up menu (Figure 21-20) is opened by clicking the right mouse button in the edit area of the Source window.
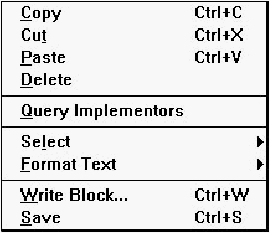
[Figure 21-20 Source window pop-up menu commands
Copy
Copies the selected text to the Clipboard.Cut
Copies the selected text to the Clipboard, then deletes it from the buffer.Paste
Inserts the text from the Clipboard at the insertion point.Delete
Deletes the selected text from the buffer.Query Implementors
Interprets the tokens or symbols surrounding the insertion point as a C++ class member name and locates all classes with a member of this name. The results are displayed in the Members window (Figure 21-21).
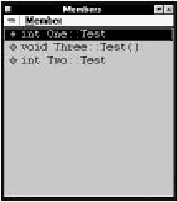
[Figure 21-21 Members window
For example, if the token is Test, Query Implementors shows a list of all implementors of Test, such as One::Test.
In the Members window, you can select an implementor and choose Show Source from the Member menu to open a Source window to the corresponding source code or, double-click an implementor to open a Class Editor window to the member source. Note that if only one implementor of a token is found, the Query Implementors command opens the Class Editor window directly, without first opening the Members window.
Select
Opens the Select submenu (Figure 21-22).
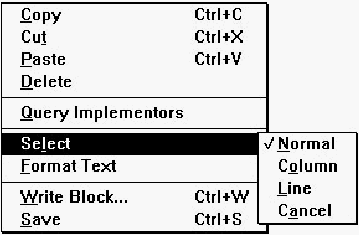
[Figure 21-22 Select submenu commands
Normal
Restores the original text select block to normal mode, undoing changes caused by Column and Line (see the following).Column
Changes the text selection block to a column-oriented select block, in which only the characters in the columns between the start and end of the original text block are selected.Line
Changes the text selection block to a line-oriented select block, in which all characters in the lines between the start and end of the original text block are selected.Cancel
Deselects the current select block.Format Text
Opens the Format Text submenu (Figure 21-23).
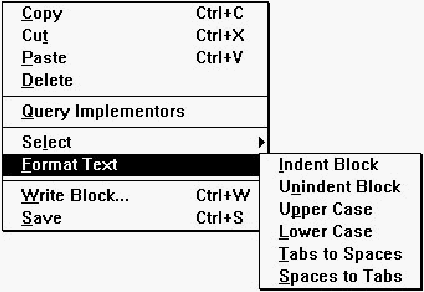
[Figure 21-23 Format Text submenu commands
Indent Block
Indents all nonblank lines in the selected text by one tab stop. Tabs are inserted as tab characters or as spaces, depending on the current buffer option settings. All text in a region will be indented if a region is selected upon issuing the command.Unindent Block
Unindents all lines in the selected text by one tab stop. All text in a region will be unindented if a region is selected upon issuing the command.Upper Case
Changes all alphabetic characters in the selected text to uppercase.Lower Case
Changes all alphabetic characters in the selected text to lowercase.Tabs to Spaces
Changes all tab characters in the selected text to spaces. The number of spaces used to replace each tab character depends on the Tab spacing option.Spaces to Tabs
Changes spaces in the selected text to tab characters. The number of spaces used to create each tab character depends on the Tab spacing option.Write Block
Opens a Write Block dialog box. Select a file or type a new name; the editor writes the currently selected text block to this file. To append the selection block to a file, check Append.Save
Saves the current buffer to disk. If the file is untitled, this command executes Save As.Toolbar commands
The Source window toolbar (Figure 21-24) offers quick access to several menu choices.
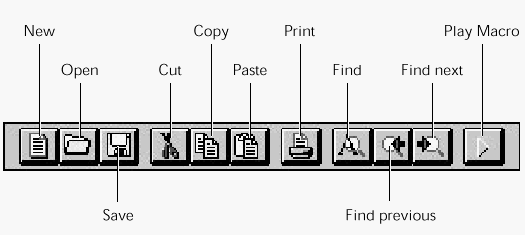
[Figure 21-24 Source window toolbar
- New:
- Same as choosing New from the File menu.
- Open:
- Same as choosing Open from the File menu.
- Save:
- Same as choosing Save from the File menu.
- Cut:
- Same as choosing Cut from the Edit menu.
- Copy:
- Same as choosing Copy from the Edit menu.
- Paste:
- Same as choosing Paste from the Edit menu.
- Print:
- Same as choosing Print from the File menu.
- Find:
- Same as choosing Find from the Edit menu.
- Find previous:
- Searches backward in the file for the search string.
- Find next:
- Searches forward in the file for the search string.
- Play macro:
- Same as choosing Play Macro from the Macro menu.
Text Settings
Choosing Text Settings from the Source window's Edit menu opens the Editing/Browsing Settings dialog box, a workspace with tabs along the top margin. The tabs are used to switch between several sets of options. Each set of options is described below.General options The General options set (Figure 21-25) contains options for undo levels and the key binding file, as well as some options related to the Class and Hierarchy Editors.
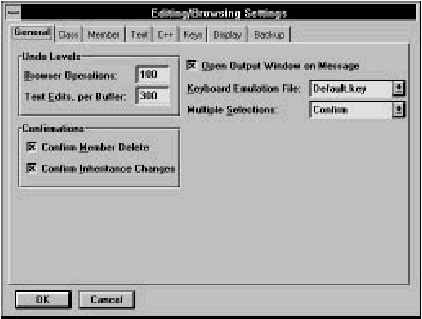
[Figure 21-25 General options
Browser operations
Specifies the number of operations that can be undone in the Class and Hierarchy Editors. See Chapter 19, Class Editor Reference, and Chapter 20, Hierarchy Editor Reference.Text edits, per buffer
Specifies the number of edit operations that can be undone per buffer.Confirmations
Enables confirmation requests for various operations in the Class and Hierarchy Editors. See Chapter 19, Class Editor Reference, and Chapter 20, Hierarchy Editor Reference.Open output window on message
Lets the IDDE open an error window whenever there is an error of any kind (during compilation, during parsing, and so on.)Keyboard emulation file
Specifies the key bindings set to be used. Key bindings allow you to associate keystroke sequences with functions and macros. Information about key bindings sets can be found in the Digital Mars C++ IDDE Help.Multiple selections
Enables multiple selections in lists in the Class and Hierarchy editors. See Chapter 19, Class Editor Reference, and Chapter 20, Hierarchy Editor Reference.Text options
The Text options set (Figure 21-26) contains options for indentation, cursor styles, keyboard emulation, and text editor font.
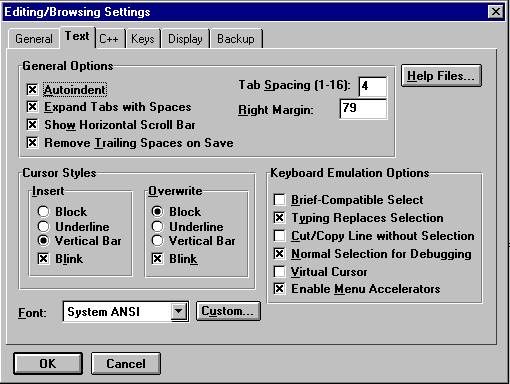
[Figure 21-26 Text options
Tab spacing
Specifies the default for the number of columns between tab stops. This value may be overridden locally in each buffer.Right margin
Specifies the default for the column that acts as the right margin. This value may be overridden locally in each buffer.Autoindent
Indents automatically on newline. When you press Enter, the editor positions the cursor directly below the first nonblank character in the previous line. This option may be overridden locally in each buffer.Expand tabs with spaces
Tabs are inserted into the text as an appropriate number of spaces, rather than as tab characters. This option may be overridden locally in each buffer.Show horizontal scroll bar
Enables the horizontal scroll bar at the bottom of the Source window.Remove trailing spaces on save
Trailing spaces and Tabs are removed from the end of each line when a file is saved.Cursor styles
Specifies caret style. You may set styles individually for the caret in Insert and Overwrite modes. Styles are:- Block:
- The current character is displayed in inverse video.
- Underline:
- The current character is underlined.
- Vertical bar:
- A vertical bar appears to the left of the current character.
- Blink:
- The cursor blinks. The blink rate is specified in the Windows Control Panel.
Font
Specifies the text font. You can select a predefined font from the drop-down list, or you can click Custom and select any installed font from a Windows Font dialog box.Brief-compatible select
If you choose this option, then enter the "Toggle Mode Select" mode. The editor remains in selection mode when you use the arrow keys.Typing replaces selection
Enables the Windows standard convention of replacing selected text with any typed character or pasted text. If this option is not selected, typing or pasting inserts the text to the left of the current selection.Cut/copy line without selection
If no text is selected, Cut and Copy, respectively, cut and copy the current line. If text is selected, Cut and Copy work as usual.If this option is not selected, Cut and Copy have no effect if no text is selected.
Normal selection for debugging
Enables normal selection of text when in debugging mode. If disabled, you can drag from the source window to the Assembly, Data/Object, and Function windows while debugging.Virtual cursor
Enables virtual cursor mode, in which you can position the caret anywhere in the window, regardless of line endings. Note that even with this option enabled, you still cannot position the caret beyond the last line in the file.Enable menu accelerators
Enables menu accelerator keys. With this option selected, new windows have underscores beneath the top-level menu items to show the Alt key combination you can use to access the menu.Help Files
Clicking on Help Files opens the Text Help File Configuration dialog box, as shown in Figure 21-27.
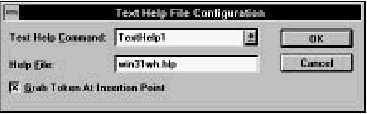
[Figure 21-27 Text Help File Configuration dialog box
This dialog box lets you associate particular Windows Help files with each of the four Text Help commands. The Text Help commands are run by key sequences such as Shift+F1. (The exact mapping of key sequences to Text Help commands depends on the current key mapping. See "Keys options," later in this chapter.) The Text Help commands call the Windows API function Windows Help, passing it the name of a Windows Help file and (optionally) a keyword. The Text Help commands are useful, for example, for gaining access to help on a particular API function or MFC class directly from the source code.
- Text Help Command:
- Specifies a Text Help command (TextHelp1, TextHelp2, TextHelp3, TextHelp4).
- Help File:
- Specifies the Windows Help file to be associated with the selected Text Help command. This filename is passed to Windows Help when the Text Help command is run.
- Grab Token At Insertion Point:
- If this box is checked, the Text Help commands pass the token at the insertion point in the text buffer to Windows Help as a keyword. This causes Windows Help to search for the associated topic, and, if found, to immediately display help on the keyword topic.
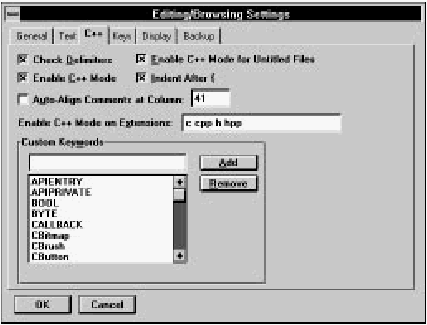
C++ options
The C++ options set (Figure 21-28) contains options to check delimiters, indent after braces, and auto-align comments. It also allows you to add custom keywords to the keyword dictionary.
[Figure 21-28 C++ options
Check delimiters
If you type a right parenthesis, square bracket, or brace, the editor briefly highlights the corresponding left delimiter. If no matching delimiter is found, an error message is displayed.Enable C++ mode
This option enables C++ mode globally. If it is not selected, C++ mode features are disabled for all buffers, regardless of local buffer option settings.Enable C++ mode for untitled files
When this option is on, new files that have not yet been given a name are assumed to be C/C++ source. This box should be checked in most circumstances, so that keywords can be recognized in new files, for example.Indent after {
If the last character typed on a line is a left brace, the next line is indented automatically by an extra tab stop. This option works only if Autoindent is enabled in the buffer. Also, if the first character on a line is a right brace (}), the line is unindented automatically; this is independent of the Autoindent option.Auto-align comments at column
If this option is enabled, when you type // to start a C++ comment, the editor automatically indents the comment to a specified alignment column. You can specify the alignment column in the adjacent textbox.Enable C++ mode on extensions
Specifies the file extensions for which C++ mode is automatically enabled. Type the extensions into the textbox, separated by spaces.Custom keywords
You can maintain a set of custom keywords that are highlighted in the edit window in a manner you specify (see "Display options," later in this chapter).To add a new keyword, type the keyword into the textbox and click on Add. To remove a keyword from the list, click on the keyword in the list and click on Remove.
Keys options
The Keys options set (Figure 21-29) lets you customize key bindings and assign key combinations to macros.
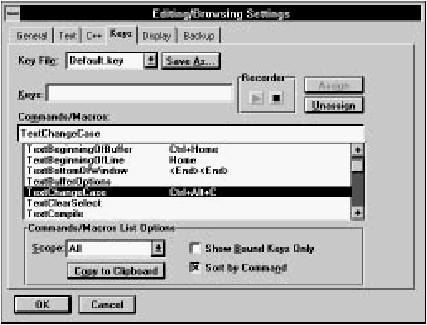
[Figure 21-29 Keys options
A Key Bindings file (.key) associates keystroke sequences with editor commands and user-defined macros. You can select the particular key binding set you want to use either with the Key File option below, or with the Keyboard Emulation file option under the General tab (see General options, earlier in this section).
Commands are grouped into functional categories. The groups are:
- Global:
- Global commands, used anywhere (includes all user-defined macros)
- Member:
- Member-related commands, used in the Class and Hierarchy Editors
- Text:
- Text editor functions and commands, used in Source windows
- Class:
- Class-related commands, used in the Class and Hierarchy Editors
- Project:
- Project-related commands, used in the Project window
Key file
Specifies the key bindings set to be used. Select a keyboard emulation file from the drop-down list.Keys
Specifies a key sequence. This is not an ordinary textbox; it can display any keystroke sequence.There are two ways to enter a keystroke sequence into the textbox:
- Click in the textbox and type the keystroke sequence. You can enter most sequences in this way. (Keys you cannot enter directly into the box include Home, End, Delete, Backspace, Right Arrow, Left Arrow, and Tab.)
- Use the Recorder buttons. Click on the green arrow to start recording. Enter your keystroke sequence. Click on the red box to stop recording.
Commands/macros
The textbox displays the currently selected command (or macro). You can type in the command name or select a command from the list by clicking on it.The list displays commands and associated key sequences. If more than one sequence is assigned to a command, it is listed as many times as necessary. The content and sorting of the list is determined by the Commands/Macros List Options.
Commands/macros list options
Determine the filtering and sorting of commands and macros shown in the Commands/Macros list.- Scope:
- Displays commands only in the specified functional category. Categories are Global, Member, Text, Class, and Project. Specify All to see all commands.
- Show bound keys only:
- Shows only those commands with an associated keystroke sequence.
- Sort by command:
- Displays the list alphabetically by command. If this option is not selected, the list is ordered by key sequence.
- Copy to clipboard:
- Copies the current contents of the commands/ macros list to the Clipboard.
Assign
Assigns the keystroke sequence to the selected command.If another command in the same functional category is already bound to this keystroke sequence, you are asked if you want to reassign the sequence to the new command.
Unassign
Dissociates the selected command from its keystroke sequence.Save as
Saves the key bindings to a new file. When prompted, type the name of the new file, or select a file from the drop-down list.Display options
The Display options set (Figure 21-30) lets you select special font colors and styles for keywords, comments, preprocessor symbols, and other special text.
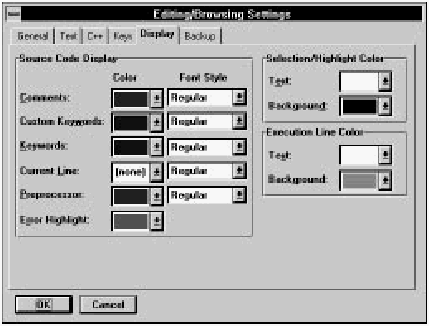
[Figure 21-30 Display options
Source code display
Allows you to customize syntax highlighting. You can specify the highlighting for:- Comments:
- C/C++ comments
- Custom keywords:
- Special keywords you specify. (See "C++ options," earlier in this chapter.)
- Keywords:
- C/C++ keywords
- Current line:
- The line containing the insert point
- Preprocessor:
- C/C++ preprocessor directives
- Error highlight:
- Lines on which compiler errors were found
Selection/highlight color
Specifies the text and background color of selected text.Execution line color
Specifies the text and background color of the current execution line during debugging.Backup options
The Backup options set (Figure 21-31) contains options for backing up files.
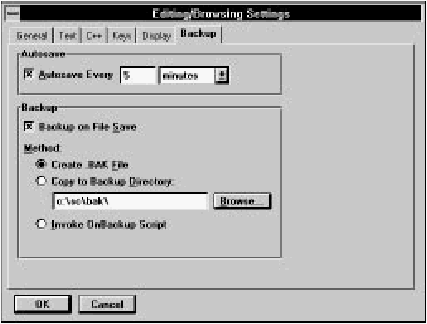
[Figure 21-31 Backup options
Autosave
Causes the editor to save your work automatically after a certain number of changes, or after a certain number of minutes since the last save. Specify the number of changes or minutes in the textbox, and select changes or minutes from the drop-down list.Backup on file save
This enables automatic backup on save. You must also select the backup method:- Create .bak File:
- Copies the previous saved version to file with the extension .bak.
- Copy to backup directory:
- Copies the previously saved version to another directory. Type the directory into the textbox, or click on Browse to select a directory from a Directory dialog box.
- Invoke OnBackup script:
- Runs a macro called OnBackup.
Using Global Find
Global Find is a multi-file search facility. You specify the files to be searched and the string or regular expression to be searched for. Global Find presents a list of files in which a match was found and allows you to view and edit the files, add files to the project, or refine the search criteria and search again.Defining the search
You open the Global Find dialog box (Figure 21-32) by choosing Global Find from a Source window's Edit menu, choosing Global Find from the IDDE's Tools menu, or clicking on the Find button in the Edit Buffers dialog box.
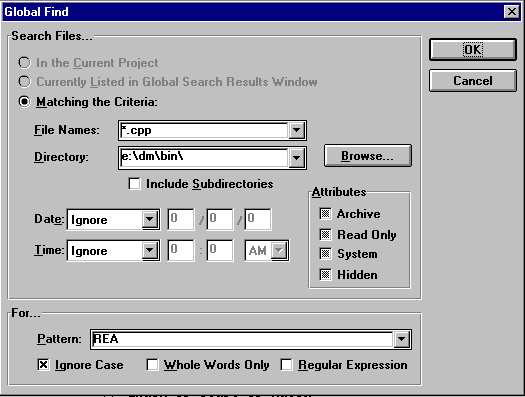
[Figure 21-32 Global Find dialog box
The Global Find dialog box has two sections. The upper section specifies the files to be searched, and the lower section specifies the pattern to be searched for.
Search Files...
Three options are available for specifying the files to be searched.- In the current project
- All files in the current project are searched.
- Currently listed in global search results window
- Enabled only after an initial global search has been performed. It limits the search to files in which a match was found in the previous global search.
- Matching the criteria
- Specify files by filename patterns, directory, date, time,
and attributes.
- File names:
- Comma-separated list of filenames and patterns. To search all files, use *.*.
- Directory:
- Search files in the specified directory. You can click on Browse to select a directory from the Choose Directory dialog box. Check Include Subdirectories to search files in subdirectories as well.
- Date:
- Select Ignore to ignore the date. Otherwise, specify a date and one of the relational options. For example, specify On and 11/6/94 to search files last modified on November 6, 1994, or After 4/1/90 and to search files last modified after April 1, 1990.
- Time:
- Select Ignore to ignore the time. Otherwise, specify a time and one of the relational options.
- Attributes:
- Search files with the given attributes. File attributes are
Archive, Read Only, System, and Hidden.
The Attributes check boxes are three-state check boxes:
- checked
- files with the given attribute are searched.
- cleared
- files without the given attribute are searched.
- grayed
- the attribute is ignored when deciding which files to search.
For...
Type the pattern to search for into the textbox. These options modify the search:- Ignore case
- Do not consider case when searching for a match.
- Whole words only
- Consider text a match only if it is not part of a larger alphanumeric string.
- Regular expression
- Enables regular expression matching.
A regular expression is a string with wildcards, which are:
? Matches any character. * Matches zero or more occurrences of any character. @ Matches zero or more occurrences of the previous character or expression. For example, Ax@B matches AB, AxB, AxxB, and so on. % Matches the beginning of a line. For example, %{ finds lines that start with left braces. < Matches the beginning of a line. For example, <{ finds lines that start with left braces. $ Matches the end of a line. For example, $ finds blank lines. > Matches the end of a line. For example, > finds blank lines. [...] Matches any of the characters listed between the square brackets. A hyphen can be used to specify a range of characters. For example, [axz] matches a, x, or z; [a-z] matches any lowercase letter. [~...] Matches any characters except those listed. \ Escape character indicates that the following character should be taken literally rather than used as a wildcard character. For example, \% matches a percent sign. \t Matches a tab character. \f Matches a formfeed character.
The Search window
After specifying the search criteria, click OK to start the search. As the search begins, the editor opens the Search window (Figure 21-33). This window contains a list of files in which a match is found.
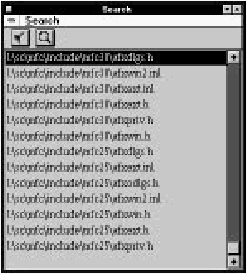
[Figure 21-33 Search window
Also during the search, the Search Progress dialog box displays statistics (Figure 21-34). Click Stop to terminate the search at the current point, or click Revert to return to the Global Find dialog box.

[Figure 21-34 Search Progress dialog box
When the search is complete, the Search Progress dialog box closes and the Search window contains a list of files in which at least one match occurred.
Search menu commands
The Search window's Search menu (Figure 21-35) contains commands to open files in Source windows, add files to the project, and continue the global search.
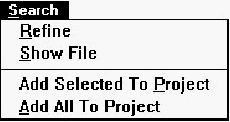
[Figure 21-35 Search menu commands
- Refine
- Reopens the Global Find dialog box. You may refine your search criteria and continue the global search. This command is disabled if no matches were found.
- Show File
- Opens the selected file in a Source window. You can also open a file by double-clicking on the file in the list. The file is positioned to the first match of the search pattern.
- Add Selected To Project
- Adds the selected file to the current project.
- Add All To Project
- Adds all files listed in the Search window to the current project.
Toolbar commands
The Search window toolbar (Figure 21-36) offers quick access to menu choices.
[Figure 21-36 Search window toolbar
- Refine
- Same as choosing Refine from the Search menu
- Show file
- Same as choosing Show File from the Search menu