


13. Lesson 4: Add Messages with ClassExpress
In Lessons 2 and 3, you learned how to generate an application framework and customize its user interface. However, the behavior of the resulting application is still generic, because it is supplied entirely by methods of MFC base classes. The inherited methods that handle Windows messages, in particular, often do nothing more than call DefWindowProc.In this lesson, you use ClassExpress to expand the functionality of the TML Reader and add member functions that handle Windows messages announcing user actions. Member functions that handle Windows messages are called message handlers, or just handlers. You can think of them as callbacks, which are called by MFC when the message they are intended to process is received. A message handler is called in response to only one message.
The Windows message stream is the lifeblood of a Windows application, regardless of whether the application is constructed in an object-oriented or a procedural way. A well-behaved Windows application can interact with the user only if it taps into the message stream and responds to messages in nondefault ways. Using ClassExpress to add MFC message handlers demonstrates how easy it is to enhance the behavior of your MFC application.
In this lesson, you:
- Launch ClassExpress from the IDDE
- Use ClassExpress to add message handlers
- Edit message handlers in the IDDE Source window
- Rebuild and run the application
- Seen how Windows messages are handled in an MFC application
- Used ClassExpress to perform the purely administrative chores associated with handling Windows messages
Windows Message Handling in MFC
Regardless of how it is written, a Windows application receives messages that inform it of user actions and their consequences, changes in the state of other applications, or changes in the state of Windows itself. MFC transforms this message-driven model into the object-oriented model defined by its class hierarchy, thereby introducing several improvements to the design of applications. To discuss this transformation and its benefits, it is necessary first to review how messages are handled in a traditional Windows program, and to identify the shortcomings of that approach.Message handling in a traditional Windows application
In a traditional Windows program written in C, you handle a Windows message by adding code directly to the window procedure to which that message is dispatched by your application's message loop. The window procedure usually consists of a large switch statement whose cases are different messages.For example, to handle the WM_SIZE message, you must add a case WM_SIZE to the switch. The statements following that case statement must have to unpack and coerce the window procedure's parameters, wParam and lParam, into constituent parts in a way that is specific to the WM_SIZE message. The result would look much like the following:
	LRESULT CALLBACK WndProc(HWND hwnd, UINT msg, WPARAM wParam, LPARAM lParam)
	{
	    // local and static variables...
	    switch (msg)
	    {
		// ...
		case WM_SIZE:
		{
		    UINT nType = (UINT) wParam;
		    int cx = LOWORD(lParam);
		    int cy = HIWORD(lParam);
		    // Now do what you really want to do
		    // ...
		}
		break;
		// ...
		default:
		    break;
	    }
	    return DefWindowProc(hwnd, msg, wParam, lParam);
	}
The switch statement usually sprawls across several pages, and the
bodies of case statements often spill over the right margin of the
page. Data that must be preserved across messages or shared
between cases is usually stored in automatic or static variables visible
to every case. The result enjoys none of the benefits of
encapsulation or data hiding afforded by C++, and it is difficult to
read, comprehend, and maintain.
MFC's design
In MFC, window procedures are part of MFC itself; you do not edit them. Instead, the window procedures route each message to a handler- a member function of some class- whose purpose is to process that message. MFC provides default handlers, which collectively define the default behavior of an MFC application. You supply handlers only for those messages you want to process. Each handler you supply is a member function of one of your derived classes and overrides the inherited handler in the base class.However, you will sometimes find that your handler can call the inherited handler to perform the bulk of its work.
For example, to handle the WM_SIZE message, use ClassExpress to add a handler for this message to your View class. (By convention, the handler for the WM_SIZE message is named OnSize.) Whenever a WM_SIZE message is received by a window represented by an object of your View class, your handler is called. The prototype of this handler is as follows:
void OnSize(UINT nType, int cx, int cy);Notice that the parameters of OnSize contain the same information that the WM_SIZE message bears in the wParam and lParam window procedure arguments, but in an immediately usable form. No unpacking or typecasting is required. In general, the signature of each handler- its return type, the number of its arguments and their types- is specific and appropriate to the message it processes. MFC parses the messages before calling the handler.
To route Windows messages to handlers, MFC consults tables, called message maps, that pair Windows messages with the member functions that handle them. You never have to edit message maps manually because AppExpress and ClassExpress create and maintain them for you. AppExpress creates message maps when you generate an application framework. Their definitions are placed in the implementation (.cpp) files of your derived classes. When you use ClassExpress to add a handler to a class, the message map is updated automatically with a new entry associating the chosen message with your handler. Furthermore, ClassExpress adds a prototype for the new handler to the class's header file and inserts a stub for the member function into the implementation file. All you need to do is to add code to the body of the handler.
Note: This introduction to MFC message handling has necessarily been brief and has glossed over several topics you will want to learn more about. For a definitive discussion of how MFC works, see the expository chapters of the Microsoft Foundation Class Library Reference.
Because you used AppExpress in Lesson 2 to generate an application framework for the TML Reader, message maps have already been created for your derived classes. During the course of this lesson, ClassExpress updates them. ClassExpress can be run either separately- from a Program Manager icon- or from within the IDDE. Because you will be using the Source window to edit the code that ClassExpress generates, you will launch ClassExpress from within the IDDE.
Launching ClassExpress
To launch ClassExpress from the IDDE:- If you are not already in the IDDE, launch it.
- Open the project tmlread.prj in directory samples\tutorial\lesson4\start.
- Choose ClassExpress from the Tools menu. This launches ClassExpress and automatically loads the project tmlread.prj.
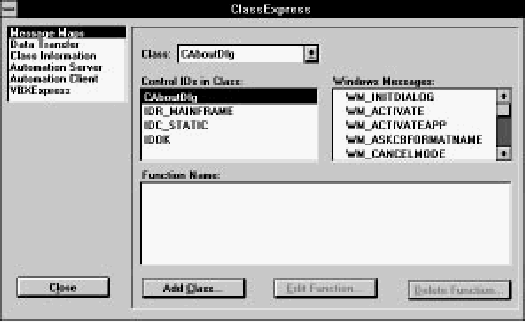
[Figure 13-1 ClassExpress, displaying the Message Maps page]
The lists on the Message Maps page
The drop-down combobox at the top of the page labeled Class contains a list of all derived classes in the TML Reader application. The class selected here directly determines the contents of two lists beneath it- those labeled Control IDs in Class and Function Name.The list labeled Control IDs in Class contains an entry for the class itself, as well as the names of any commands and controls that the selected class could potentially handle.
The list labeled Function Name contains a list of message handlers already generated for the selected class by AppExpress. These methods are referenced in the class's message map.
The contents of the list labeled Windows Messages depends on what you select in the Control IDs in Class list. If you select the class name in the Control IDs list, then the Windows Messages list contains a list of Windows messages. However, if you select a control ID, the Windows messages list contains notification messages appropriate to that type of control. If you select a command ID (usually corresponding to a menu item), the rightmost list contains names of potential message map entries for commands.
Because the TML Reader handles messages that signal user input, the handlers must be added to the class corresponding to the window that receives those messages. Thus, you will add the handlers to the View class, CTMLReadView.
Adding Message Handlers
The requirements of the TML Reader dictate the messages you will add handlers for.- WM_SIZE
- Detect when the window is resized, so it can recompute word-wrapping
- WM_VSCROLL
- Permit scrolling through a document using the vertical scrollbar
- WM_KEYDOWN
- Permit scrolling through a document using the keyboard
- WM_SETCURSOR
- Change the cursor when it is positioned over a hyperlink
- WM_LBUTTONDOWN
- Detect clicks on hyperlink jumps so it can change its display
- WM_ERASEBKGND
- Repaint the window background
Adding a handler for WM_SIZE
To add a handler for WM_SIZE to your View class:- From the drop-down list labeled Class, select the name of the View class, CTMLReadView.
- Use the scrollbar to move through the Windows messages list until the message WM_SIZE is visible.
- Double-click on WM_SIZE.
afx_msg void OnSize(UINT nType, int cx, int cy);This is the prototype of a handler for the WM_SIZE message, as it would appear within a class declaration.
Also notice that a solid square appears to the left of the message name, WM_SIZE, indicating that a handler now exists for that message.
The ClassExpress window is displayed, as in Figure 13-2.
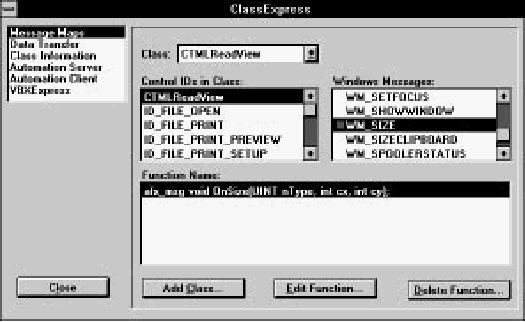
[Figure 13-2 ClassExpress after adding a WM_SIZE handler]
Adding other message handlers
Follow the procedure described in Steps 2 and 3 in the previous section to add a handler for each of the messages WM_VSCROLL, WM_KEYDOWN, WM_SETCURSOR, WM_LBUTTONDOWN and WM_ERASEBKGND: use the scrollbar of the Windows messages list to scroll to the message, then double-click on the message. Again, notice that for each message you double-click on, a new prototype is added to the Function name list, and a solid square appears to the left of the message name.What you have just done
When you add a handler for a message WM_messagename, ClassExpress generates code in three places.- The prototype for the handler is added to the declaration of the selected class, and the handler becomes a protected member function.
- An entry ON_WM_messagename() is added to the message map for the class in that class's implementation file.
- A stub function is created for the handler in the
implementation file. The body of the function just calls
the base class handler, and contains the comment:
// TODO: Add your message handler code here and/or call default
- The prototype for OnSize is added to the declaration of the class CTMLReadView in tmlrdvw.h.
- An entry ON_WM_SIZE() is added to the message map for the class CTMLReadView in its implementation file, tmlrdvw.cpp.
- A stub function for CTMLReadView::OnSize is added to the file tmlrdvw.cpp. The body of the function just calls the base class handler CView::OnSize.
Saving Your Work
To save your work and return to the IDDE, click Close at the bottom of the ClassExpress window.Clicking Close updates your project files and returns you to the IDDE. To observe the handlers in action and confirm that they are indeed called when you expect them to be, you can add code that notifies you when they are called.
Adding Code to Handlers
To add code to the OnLButtonDown and OnSize handlers, follow these steps:- Open the file tmlrdvw.cpp in a Source window.
- Find the function CTMLReadView::OnLButtonDown.
- Add the following line to the top of the function:
AfxMessageBox("Left button clicked!"); - Now find the function CTMLReadView::OnSize.
- Add the following line to the top of the function:
::MessageBeep(-1);
- Type Ctrl+S to save your changes.
Building and Running the Project
To see the effect of what you've done, perform these steps:- Choose Build from the Project menu to update the executable.
- Choose Execute Program from the Project menu to run the program.
- With the mouse cursor in the client area of the program's
window, press the left mouse button. A box containing
the message "Left button clicked!" is displayed
(Figure 13-3). This message is displayed each time you
press the left mouse button in the client area. It is not
displayed when you release the left mouse button, move
the mouse, or click with the right mouse button. To
remove the message box, click OK.
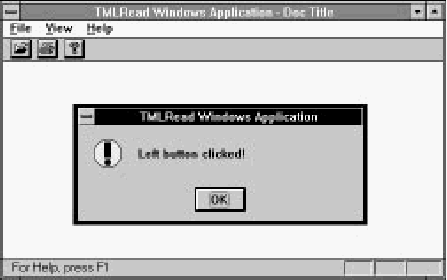
[Figure 13-3 TML Reader running, with message box displayed]
- Now resize the window by dragging a corner of the
window's border to a different position. You hear a beep
when you release the mouse button.
Note: You will already have heard beeps during the initial sequence of messages received by the View window. This is normal: the window receives multiple WM_SIZE messages early in its life-cycle.
- After you have confirmed to your satisfaction that the handlers are called when, and only when, they ought to be called, quit the program by choosing Exit from TMLRead's File menu.
Summary
In this lesson, you have learned:- How Windows messages are handled in an MFC application
- How to launch ClassExpress from the IDDE and use it to add message handlers
- How to verify that the message handlers are called in response to the messages they handle